> ## Documentation Index
> Fetch the complete documentation index at: https://nocode-docs.zeroagent.io/llms.txt
> Use this file to discover all available pages before exploring further.
# Getting Started with Zeromagic
> Getting started with Zeromagic is easy! This guide provides you a quick view on how to start and setup your application for building your APIs.
 ## Step - 0 : Login into Zeromagic
First, you'll need to sign up. Just visit our [**platform**](https://zeromagic.cloud/), click on **Sign Up**, and fill in your email and a password. Once you've signed up, you'll receive an email to verify your account. Click the link in the email, and you're all set!
To log in, just go back to our [**platform**](https://zeromagic.cloud/), click **Log In**, and enter your email and password. You can even alternatively login using your email and OTP. That's it!
Now you're ready to explore all the amazing things you can do with Zeromagic. Let's get started!
## Step - 1 : Create Organisation and Project
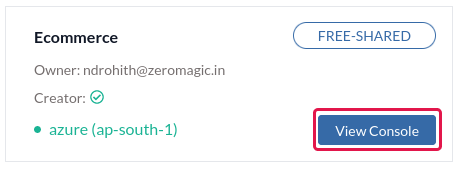
Start by creating your Organisation and Project if you haven't already. Open your `Project Console`.
> FREE-LIMIT : You can create only one project in free plan.
## Step - 0 : Login into Zeromagic
First, you'll need to sign up. Just visit our [**platform**](https://zeromagic.cloud/), click on **Sign Up**, and fill in your email and a password. Once you've signed up, you'll receive an email to verify your account. Click the link in the email, and you're all set!
To log in, just go back to our [**platform**](https://zeromagic.cloud/), click **Log In**, and enter your email and password. You can even alternatively login using your email and OTP. That's it!
Now you're ready to explore all the amazing things you can do with Zeromagic. Let's get started!
## Step - 1 : Create Organisation and Project
Start by creating your Organisation and Project if you haven't already. Open your `Project Console`.
> FREE-LIMIT : You can create only one project in free plan.
 ## Step - 2 : Add Database
Go to `Database` section under your project console dashboard and add your database. Zeromagic allows you to **spin-up databases internally, which are managed by zeromagic** and also supports **BYOD(Bring Your Own Database)**.
> FREE-LIMIT : You are allowed to add only two databases. One spin-up and one BYOD in free plan.
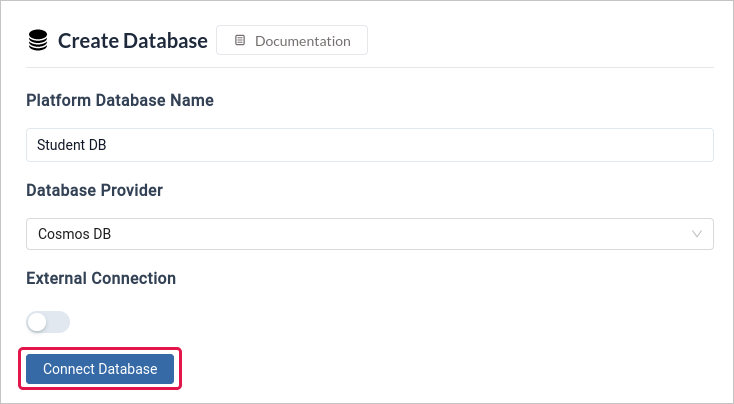
**To Spin-up Database** - Click `Create Database`, then choose a name for `Platform Database Name` to identify database on your platform and select `Database Provider` from the available database options. Make sure `External Connection (BYOD)` is disabled. Click `Connect Database` to connect to your database.
**To BYOD(Bring Your Own Database) Database** - Click `Create Database`, then choose a name for `Platform Database Name` to identify database on your platform and select `Database Provider` from the available database options. Now, enable the `External Connection (BYOD)` in toggle. Add the required database configurations and click `Connect Database` to connect to your database.
## Step - 2 : Add Database
Go to `Database` section under your project console dashboard and add your database. Zeromagic allows you to **spin-up databases internally, which are managed by zeromagic** and also supports **BYOD(Bring Your Own Database)**.
> FREE-LIMIT : You are allowed to add only two databases. One spin-up and one BYOD in free plan.
**To Spin-up Database** - Click `Create Database`, then choose a name for `Platform Database Name` to identify database on your platform and select `Database Provider` from the available database options. Make sure `External Connection (BYOD)` is disabled. Click `Connect Database` to connect to your database.
**To BYOD(Bring Your Own Database) Database** - Click `Create Database`, then choose a name for `Platform Database Name` to identify database on your platform and select `Database Provider` from the available database options. Now, enable the `External Connection (BYOD)` in toggle. Add the required database configurations and click `Connect Database` to connect to your database.
 ## Step - 3 : Add Environment
Go to `Environments` section in the console. Click `Create Environment` on your top-right, then add your **Environment name**, **Map Database to the environment** using the dropdown and select **execution tier** from the dropdown menu. Environments are your individual execution environment where your RESTful APIs gets executed.
> FREE-LIMIT : You are allowed to add two environments in your free-plan.
## Step - 4 : Add Modules
To create a new module, go to `Modules` section in the console. Click `Create Module` button and enter the **Module Name, Description and API Route (path where your module APIs can be accessed)**. Then click `Create Module` to add your module and then open your module.
> FREE-LIMIT : You are allowed to add one module under free plan.
## Step - 5 : Start creating APIs
Open your created Module and start creating your **RESTful and GraphQL APIs** hassle-free and fast using our magic visual builder. You can use the `App URL` in environments to handle all your api calls from your client applications. `Auth URL` is used to handle your built-in authentication methods in your client applications.
That's it! You're done with this simple setup. Start building your magic apis now 🧙♂️...
Having Trouble?
If you encounter any issues during signup or login, don't hesitate to reach out to Zeromagic's support team. They're available to help you get started and answer any questions you might have.
### Support Links
* [Flow Control](/restapi/flow-builder/blocks/flow-control/if-else)
* [Database](/restapi/flow-builder/blocks/database-blocks/create-records)
* [Action](/restapi/flow-builder/blocks/action-blocks/declare-variable)
## Step - 3 : Add Environment
Go to `Environments` section in the console. Click `Create Environment` on your top-right, then add your **Environment name**, **Map Database to the environment** using the dropdown and select **execution tier** from the dropdown menu. Environments are your individual execution environment where your RESTful APIs gets executed.
> FREE-LIMIT : You are allowed to add two environments in your free-plan.
## Step - 4 : Add Modules
To create a new module, go to `Modules` section in the console. Click `Create Module` button and enter the **Module Name, Description and API Route (path where your module APIs can be accessed)**. Then click `Create Module` to add your module and then open your module.
> FREE-LIMIT : You are allowed to add one module under free plan.
## Step - 5 : Start creating APIs
Open your created Module and start creating your **RESTful and GraphQL APIs** hassle-free and fast using our magic visual builder. You can use the `App URL` in environments to handle all your api calls from your client applications. `Auth URL` is used to handle your built-in authentication methods in your client applications.
That's it! You're done with this simple setup. Start building your magic apis now 🧙♂️...
Having Trouble?
If you encounter any issues during signup or login, don't hesitate to reach out to Zeromagic's support team. They're available to help you get started and answer any questions you might have.
### Support Links
* [Flow Control](/restapi/flow-builder/blocks/flow-control/if-else)
* [Database](/restapi/flow-builder/blocks/database-blocks/create-records)
* [Action](/restapi/flow-builder/blocks/action-blocks/declare-variable)