> ## Documentation Index
> Fetch the complete documentation index at: https://nocode-docs.zeroagent.io/llms.txt
> Use this file to discover all available pages before exploring further.

# Google OAuth2.0 Authentication with ReactJS

> Learn how to build Google OAuth2.0 authentication with Zeromagic using React JS.

In this tutorial, we will learn how to implement Google OAuth2.0 authentication in a ReactJS application. We will create a simple ReactJS application that allows users to sign in using their Google account and redirect them to a dashboard page after successful authentication.

## Step 1 : Get Google OAuth Client ID and Client Secret

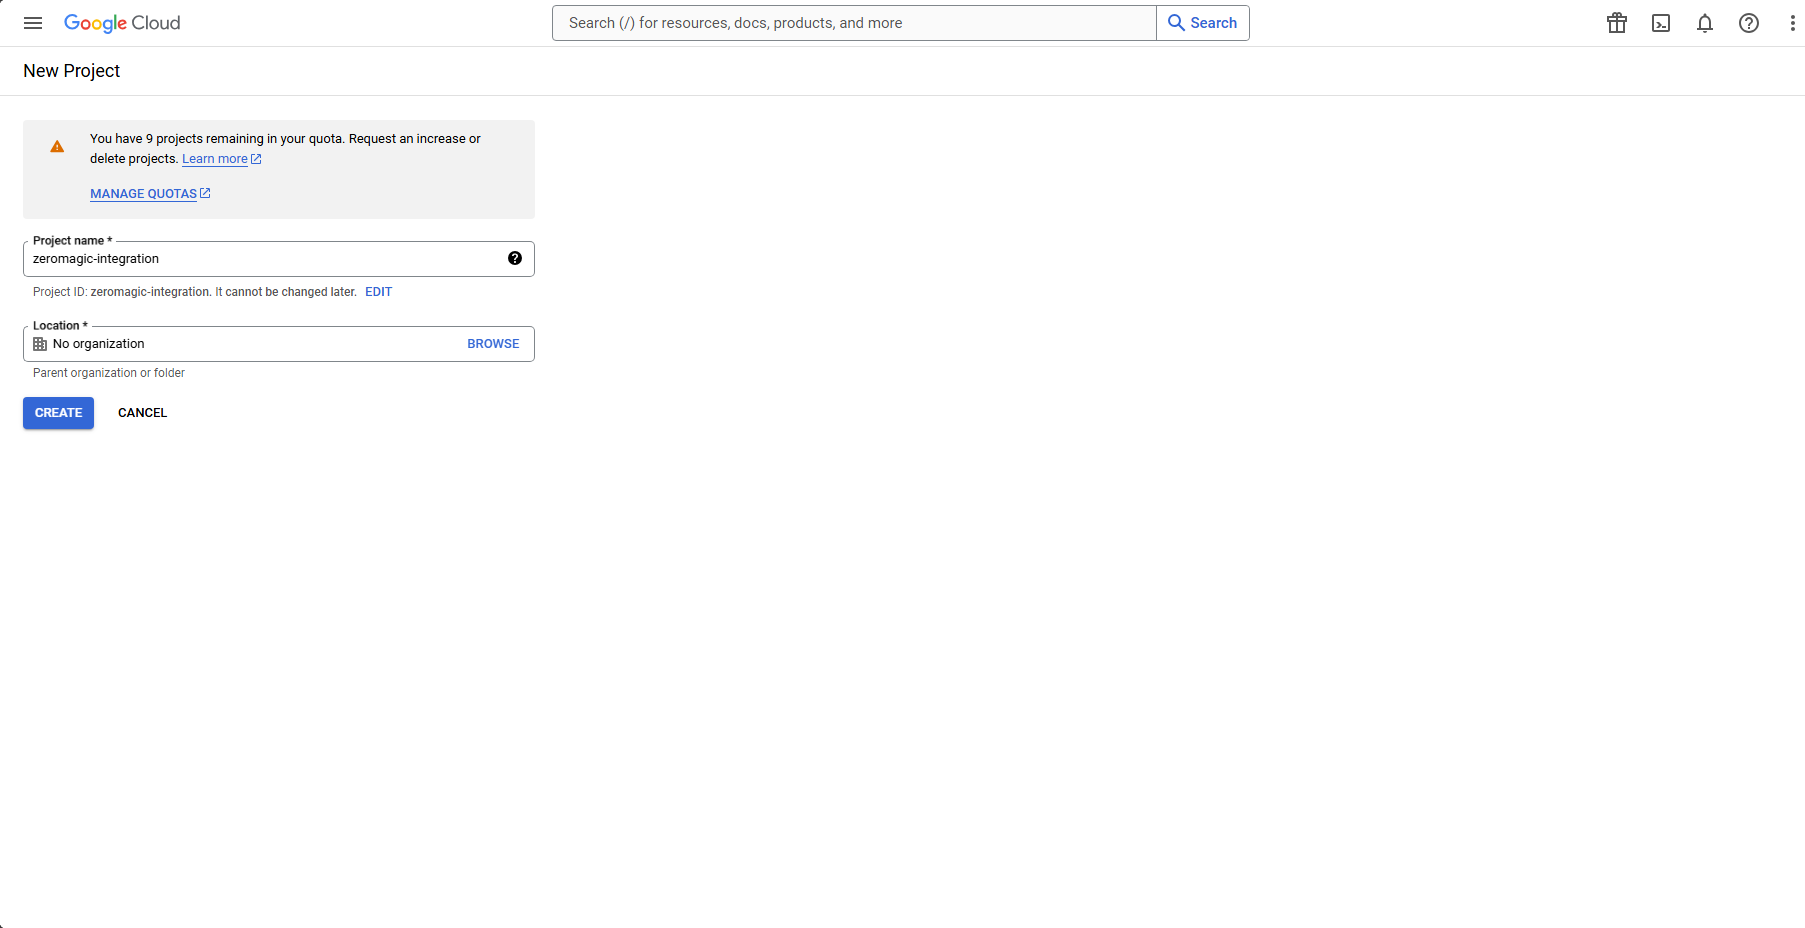
1. Go to the Google Developers Console and [Create a new project](https://console.cloud.google.com/projectcreate).

   <img src="https://mintcdn.com/zeromagiclabsprivatelimited/FNI2lo67ZZ_e31YS/assets/learn/googleoauth-setup-project-create.png?fit=max&auto=format&n=FNI2lo67ZZ_e31YS&q=85&s=00fe955fde8f41b0507d85e04275e889" alt="Create a new project" width="1805" height="928" data-path="assets/learn/googleoauth-setup-project-create.png" />

2. Click on the project name and then select `APIs & Services` on your left sidebar tab. Click on `OAuth consent screen` and fill in the required details.

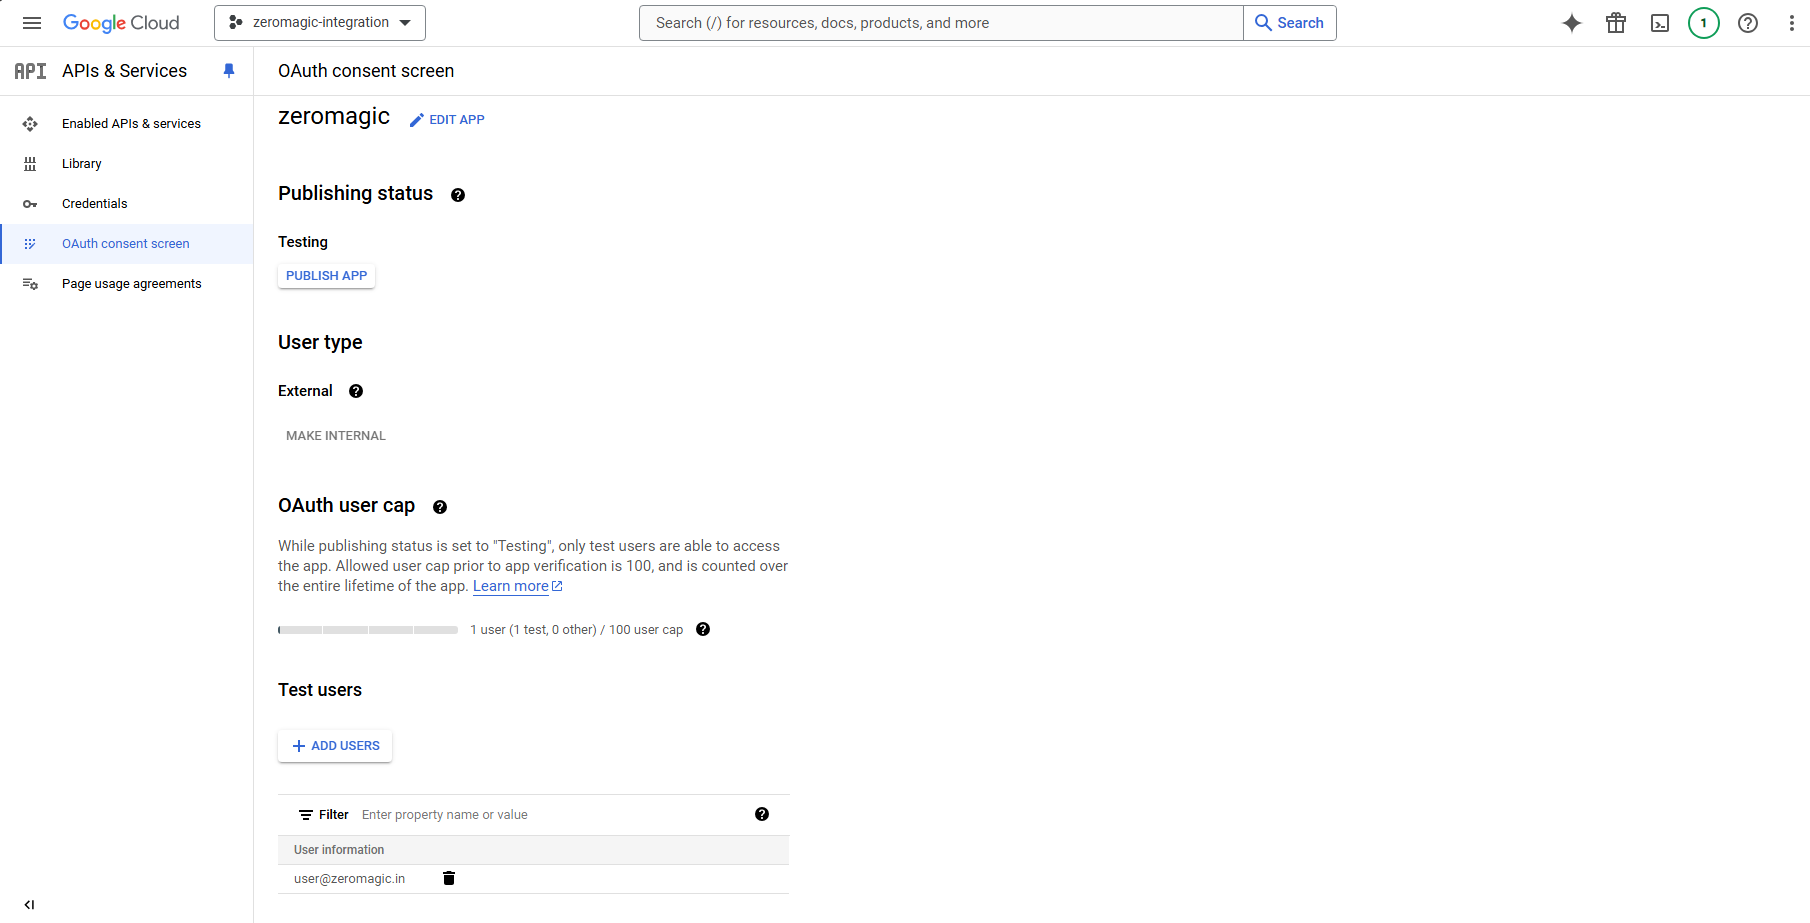
   <img src="https://mintcdn.com/zeromagiclabsprivatelimited/FNI2lo67ZZ_e31YS/assets/learn/googleoauth-setup-oauthconsent-1.png?fit=max&auto=format&n=FNI2lo67ZZ_e31YS&q=85&s=321e8509183081cd0204ef2f16ba8594" alt="OAuth consent screen" width="1813" height="924" data-path="assets/learn/googleoauth-setup-oauthconsent-1.png" />

   <Note>
     IMPORTANT

     **Test users**: While your app is in development, you can add test users to your OAuth consent screen. **These users will be able to sign in to your app with their Google accounts** without needing to verify their identity. You can add test users by clicking on the `Add users` button in the OAuth consent screen configuration page.

     > You will need to verify and move your app to production before it can be used by anyone other than the test users you have added.
   </Note>

   <img src="https://mintcdn.com/zeromagiclabsprivatelimited/FNI2lo67ZZ_e31YS/assets/learn/googleoauth-setup-oauthconsent-2.png?fit=max&auto=format&n=FNI2lo67ZZ_e31YS&q=85&s=b255252a6aef8b7cedb9d77c9699c4ca" alt="OAuth consent screen" width="1810" height="923" data-path="assets/learn/googleoauth-setup-oauthconsent-2.png" />

3. Click on `Credentials` on your left sidebar tab and then click on `Create Credentials` and select `OAuth client ID`.

   <img src="https://mintcdn.com/zeromagiclabsprivatelimited/FNI2lo67ZZ_e31YS/assets/learn/googleoauth-setup-create-credentials.png?fit=max&auto=format&n=FNI2lo67ZZ_e31YS&q=85&s=19096a43f0ff2e07c5d73ba9dd4c5e1a" alt="Create Credentials" width="1817" height="951" data-path="assets/learn/googleoauth-setup-create-credentials.png" />

   <Note>
     SERVER CONFIGURATIONS

     ReactJS - [http://localhost:3000](http://localhost:3000)

     > We are using `http://localhost:3000` as the ReactJS application URL for this tutorial in **Authorized origins**. You can replace it with your actual ReactJS application URL when rolling out to production. Example: `https://your-reactjs-app.com`

     Oauth Callback or Authorized Redirect URI - [https://authn.zeromagic.cloud/oauth/callback/](https://authn.zeromagic.cloud/oauth/callback/)
   </Note>

4. Copy the `Client ID` and `Client Secret` and we will use this to setup our authentication in the zeromagic platform.

## Step-2 : Setup Google OAuth in Zeromagic

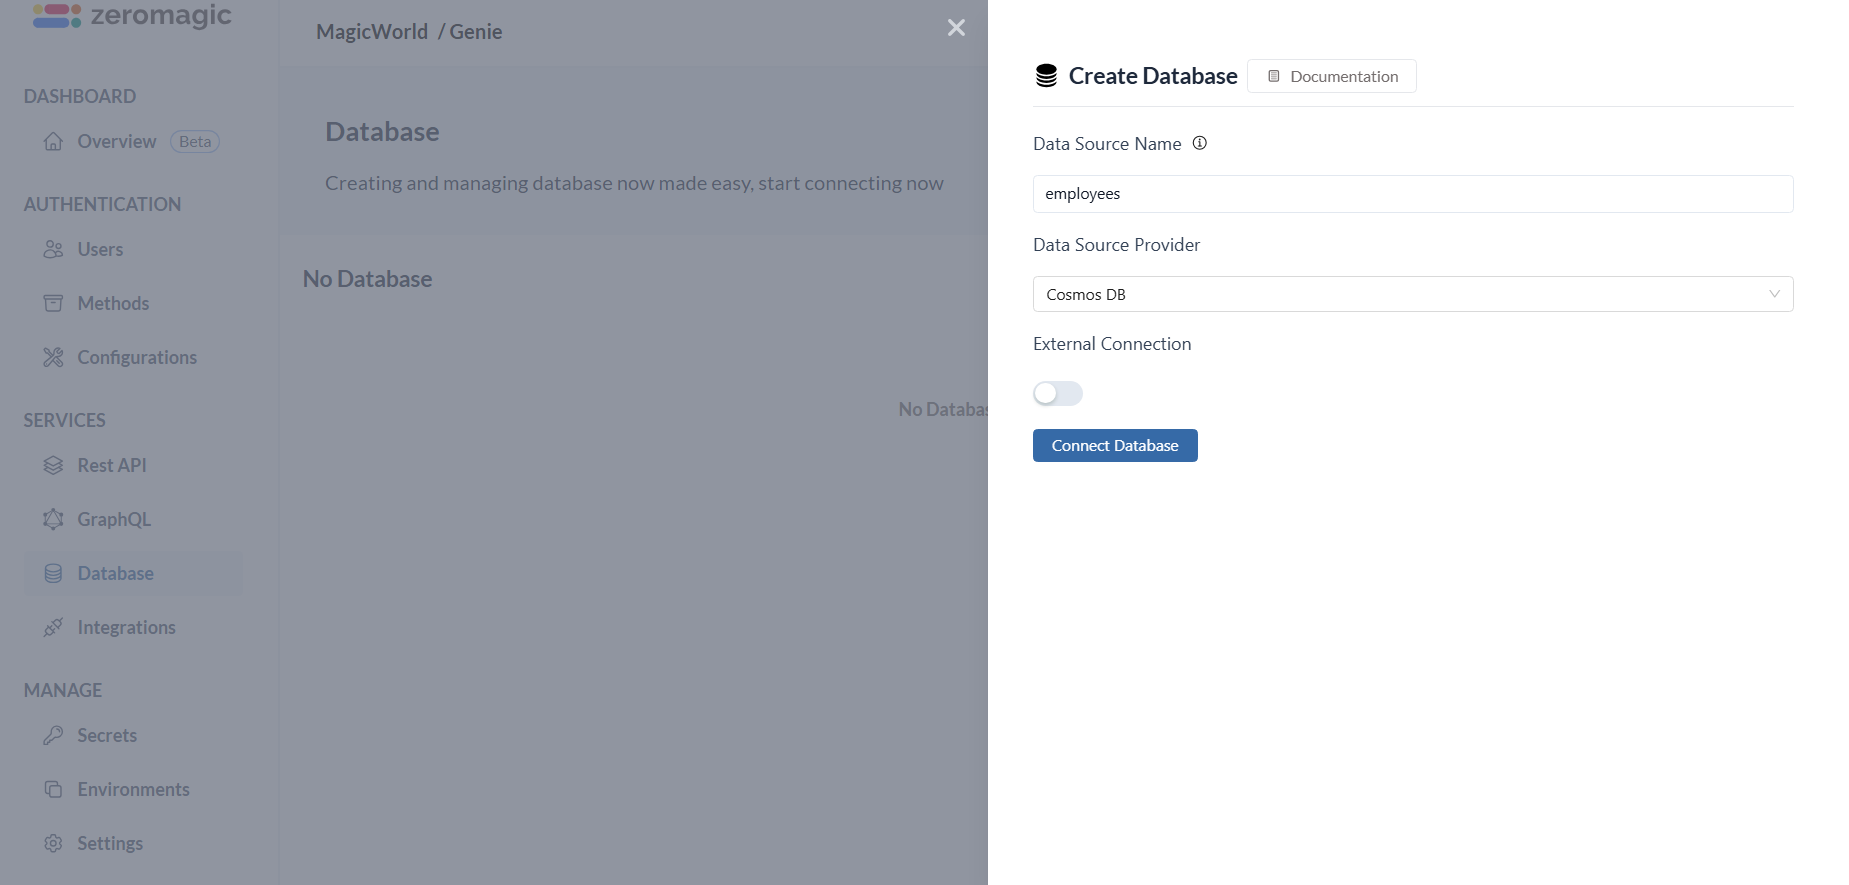
1. Create and open a new `Project` in the console. Add a `Database` to the project. You can use the database spinned up by Zeromagic or connect your own database. Here we are using the cosmosdb database provided by Zeromagic. To add a database, click on the `Create Database` on the `Database` section button and add your database.

   <img src="https://mintcdn.com/zeromagiclabsprivatelimited/h_DeJnPWvd8dA9lO/assets/images/authentication-add-database.png?fit=max&auto=format&n=h_DeJnPWvd8dA9lO&q=85&s=a6e7391c60c7ef6988e7fcaa10d1ed1a" alt="Create Database" width="1849" height="885" data-path="assets/images/authentication-add-database.png" />

   > Refer here to know more about: [Creating Database on the platform](/datasources/quickstart)

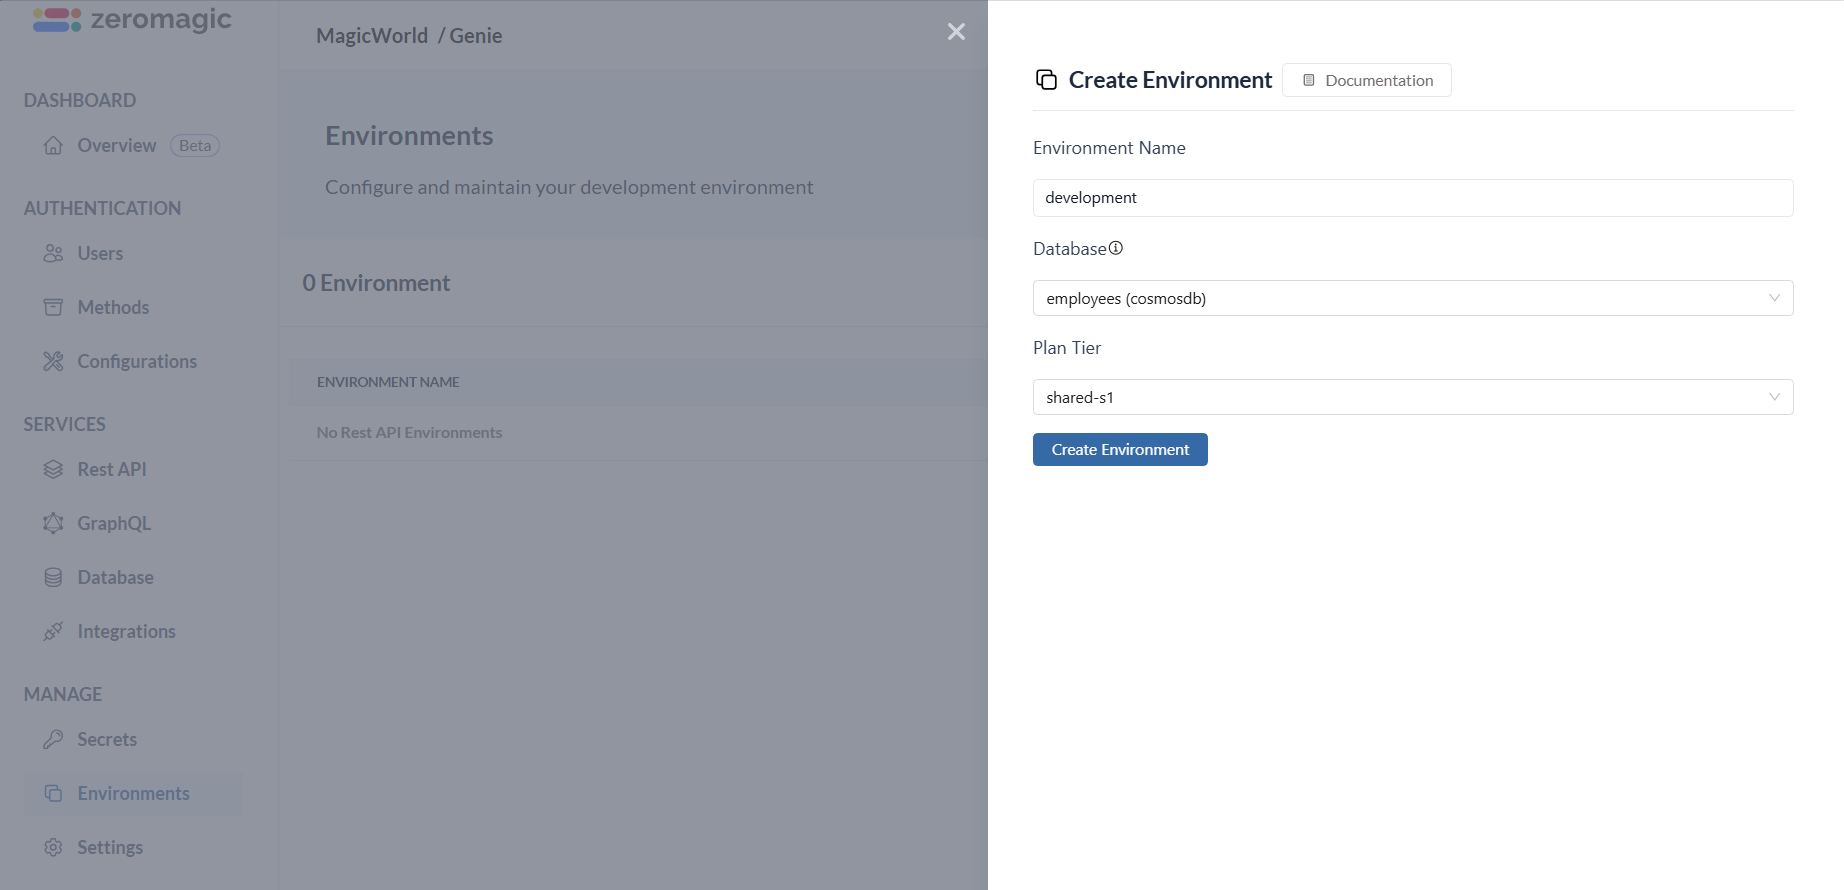
2. Create a new environment and map the added database to the environment. Here we are using the `development` environment and `employees` database
   <img src="https://mintcdn.com/zeromagiclabsprivatelimited/h_DeJnPWvd8dA9lO/assets/images/authentication-add-environment.png?fit=max&auto=format&n=h_DeJnPWvd8dA9lO&q=85&s=9fc04a7dd437fdc9b3dbfac20ba7dcfb" alt="Create environment" width="1844" height="890" data-path="assets/images/authentication-add-environment.png" />

   > Refer here to know more about: [Creating Environments on the platform](/basics/environment)

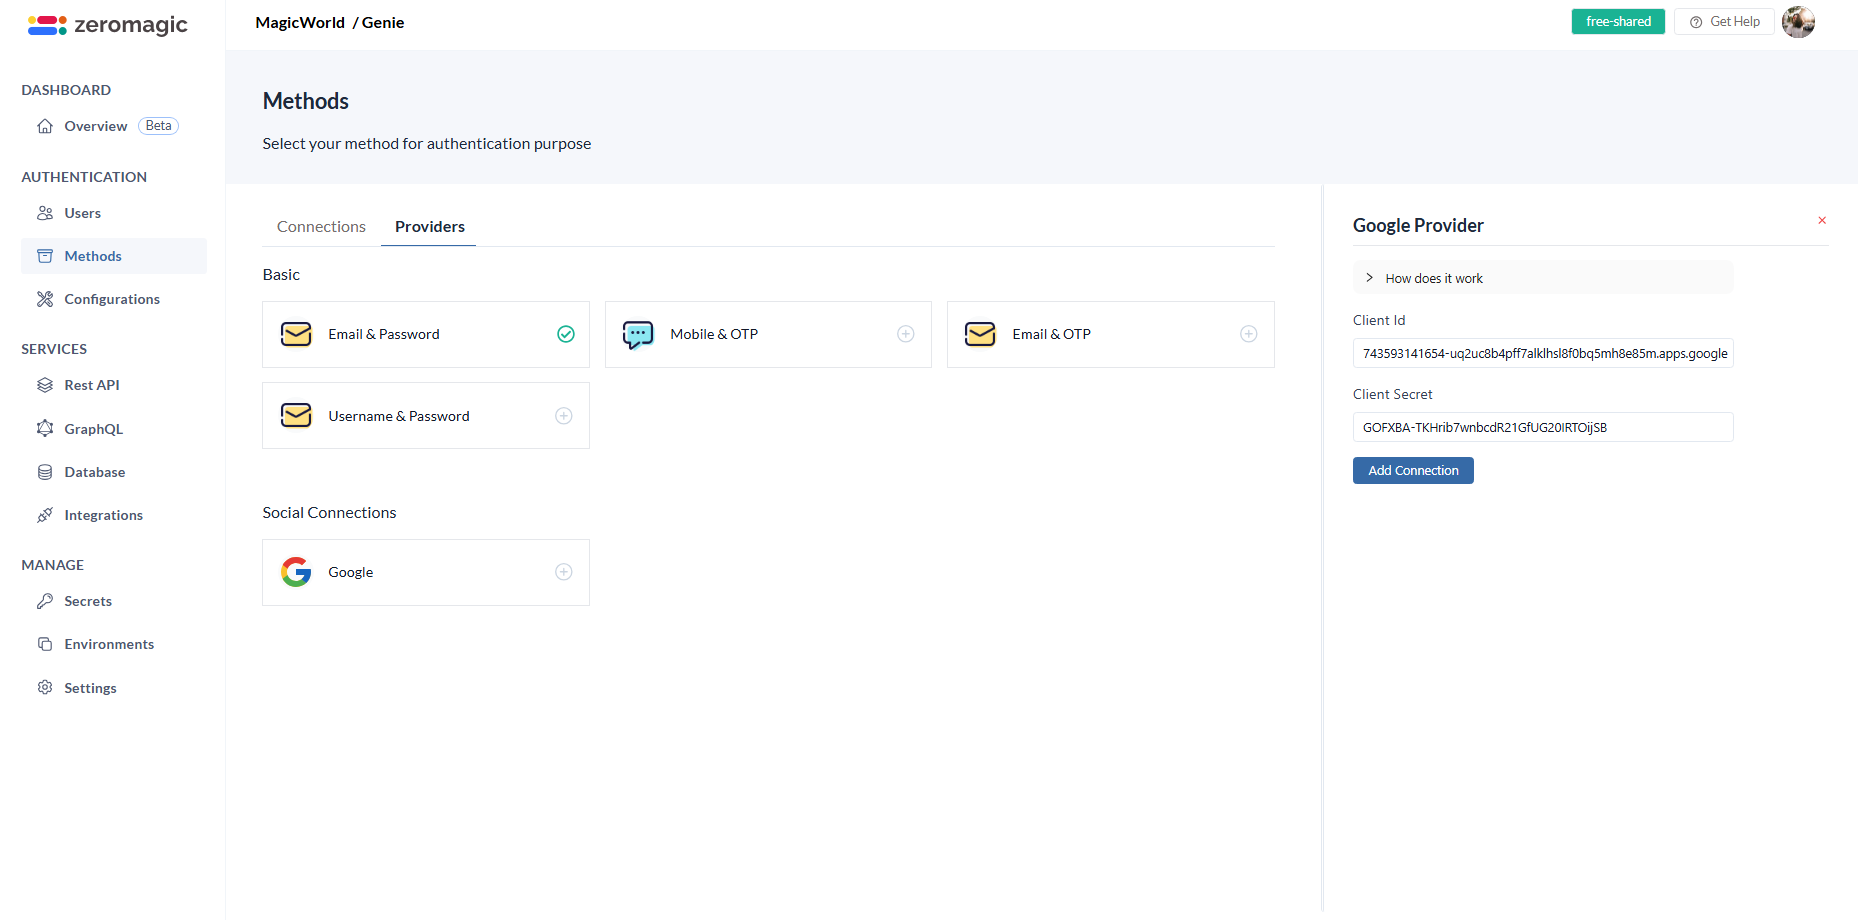
3. Add the `Google` authentication connection under Methods. Click `Add Connection` to create a new connection with the `Client ID` and `Client Secret` you copied from the Google Developers Console.
   <img src="https://mintcdn.com/zeromagiclabsprivatelimited/FNI2lo67ZZ_e31YS/assets/learn/authentication-add-googleoauth.png?fit=max&auto=format&n=FNI2lo67ZZ_e31YS&q=85&s=1a26af1fd344309a6753f53c05eaf91f" alt="Add Authentication" width="1862" height="920" data-path="assets/learn/authentication-add-googleoauth.png" />

   > Refer here to know more about: [Adding Authentication on the platform](/authentication/quickstart)

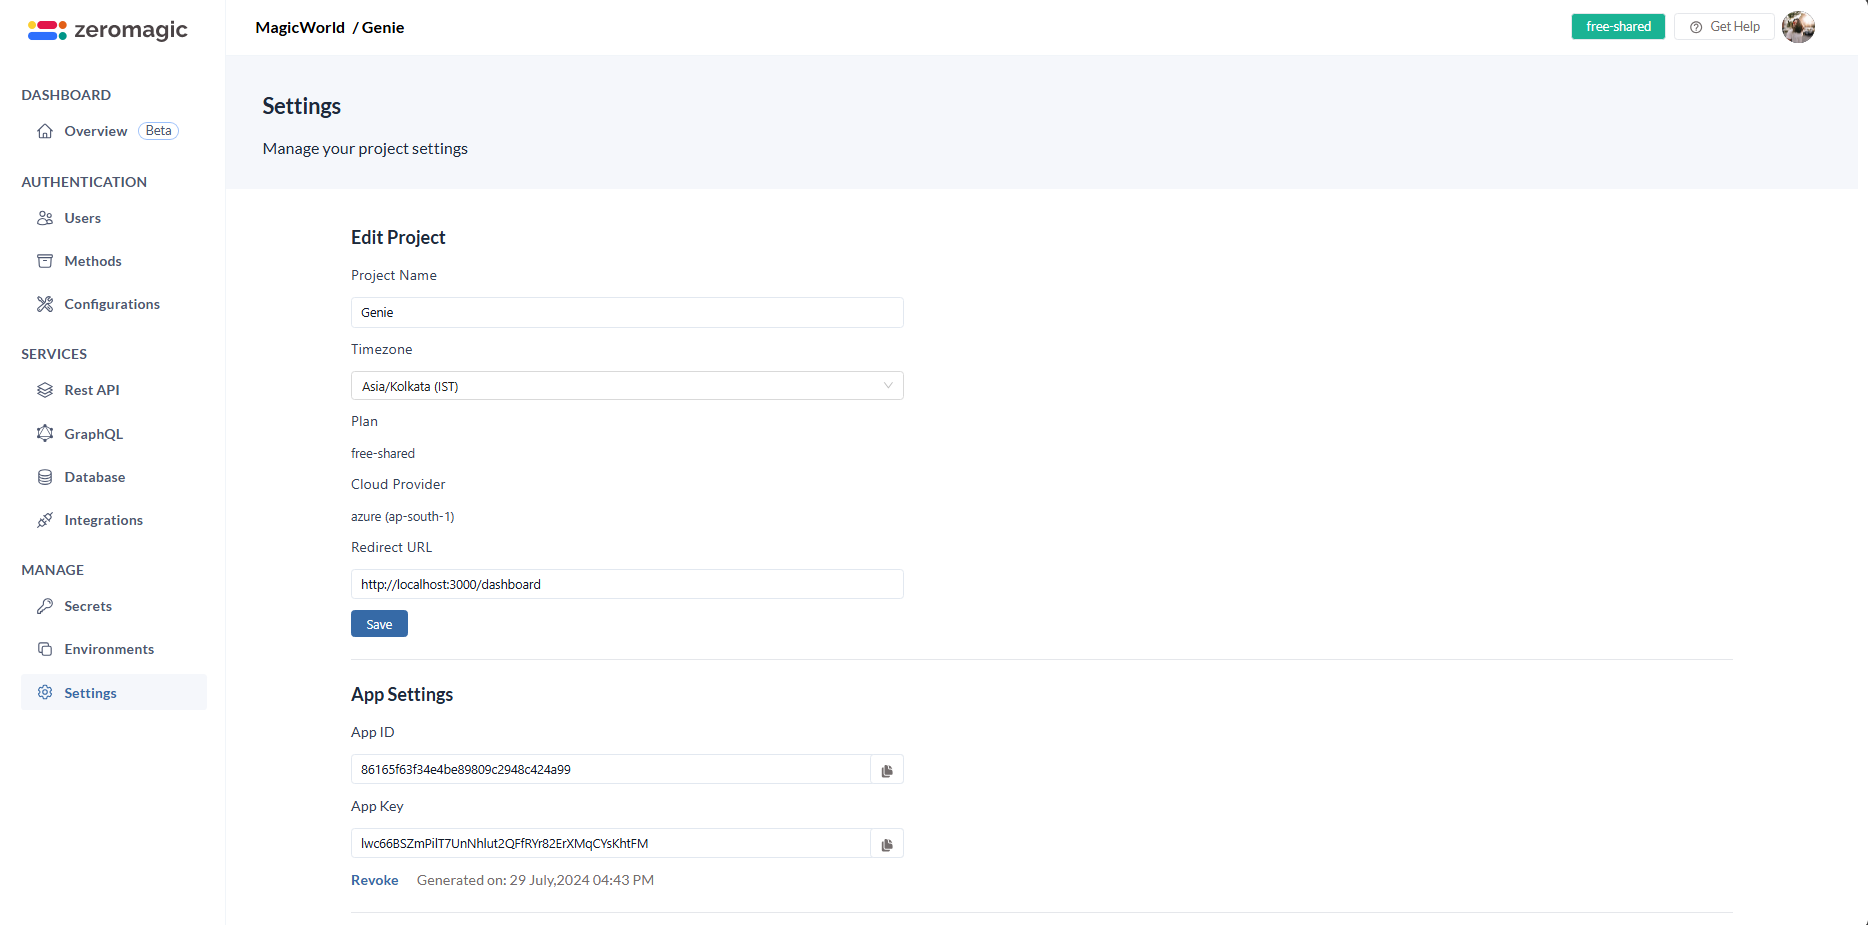
4. Go to `Settings` section in the dashboard and the Redirect URL. Here the redirect URL is `http://localhost:3000/dashboard` as we are using the local ReactJS application URL for this tutorial. You can replace it with your actual ReactJS application URL when rolling out to production. Example: `https://your-reactjs-app.com`.
   This is the url where the user data response with be appended to the query params after successful authentication.
   <img src="https://mintcdn.com/zeromagiclabsprivatelimited/FNI2lo67ZZ_e31YS/assets/learn/authentication-add-googleoauth-setup.png?fit=max&auto=format&n=FNI2lo67ZZ_e31YS&q=85&s=6c5b977de3289b2671fac49ab0395cbd" alt="Redirect URL" width="1868" height="925" data-path="assets/learn/authentication-add-googleoauth-setup.png" />

5. Now, go to `Environments` sections and select the environment you created. Copy the `Auth Endpoint URL` from the environment details. This is your authentication endpoint URL where you will be sending the APi requests. Your Auth endpoint URL looks similar to this:

   The oauth api endpath is **/oauth** and environment url **[http://authn.zeromagic.cloud/auth/86165f63f34e4be89809c2948c424a99/development/](http://authn.zeromagic.cloud/auth/86165f63f34e4be89809c2948c424a99/development/)**. So, the final URL will be

   ```curl OAuth Endpoint theme={null}
   http://authn.zeromagic.cloud/auth/86165f63f34e4be89809c2948c424a99/development/oauth  
   ```

6. Before making the API request, let's **create a new user credentials** in the database for this example. You can **skip this step if your preferring to go with registering the user** and login with that user credentials.

   > While using OAuth, if the email id is not found in the database, the user will be registered with the email id and the user will be logged in. If the email id is found in the database, the user will be logged in.

## Step-3 : Create Login Page and Dashboard Page in ReactJS

Now,let's create our simple frontend UI using ReactJS. We will create a login page where the user can click on the Google sign-in button and redirect them to the dashboard page after successful authentication.

1. Create a new React project using the following command.

```bash theme={null}
npx create-react-app googleauth-reactjs
```

2. Add this dependency to your project using the following command:

```bash theme={null}
 npm install react-router-dom
```

3. Update `App.js` with the provided code

   ```jsx App.js theme={null}
   import './App.css';
   import React from 'react';
   import { BrowserRouter as Router, Route, Routes } from 'react-router-dom';
   import LoginPage from './login';
   import DashboardPage from './dashboard';

   function App() {
   return (
       <Router>
       <Routes>
           <Route path="/" element={<LoginPage />} />
           <Route path="/dashboard" element={<DashboardPage />} />
       </Routes>
       </Router>
   );
   }

   export default App;
   ```

   Create `login.js` file and `login.css` file for the Login screen.

   <CodeGroup>
     ```jsx login.js theme={null}
     import React from 'react';
     import './login.css'; 

     const LoginPage = () => {

     const handleGoogleLogin = async () => {
         try {
         // REPLACE_HERE : Replace the {auth_base_url}/oauth with the copied URL from the environment details and with the path to the social google login endpoint
         const response = await fetch('{auth_base_url}/oauth', {
             method: 'POST',
             headers: {
             'Content-Type': 'application/json',
             'APP-KEY' : '{APP_KEY}' // REPLACE_HERE : Replace the {your_app_key} with your actual APP-KEY
             },
             body: JSON.stringify({
             connection_name: 'google',
             }),
         });

         if (!response.ok) {
             alert('Failed to authenticate with Google');
             throw new Error('Failed to authenticate with Google');
         }

         const data = await response.json();

         const authorizeUrl = data['BODY']['authorize_url'];
         if (authorizeUrl) {
             // Open the URL in the browser
             window.location.href = authorizeUrl;
         } else {
             console.error('authorize_url not found in response');
         }
         } catch (error) {
         console.error('Error during Google login:', error);
         }
     };


     return (
         <div className="login-container">
         <div className="login-box">
             <h2>Welcome to Zeromagic</h2>
             <p>Please log in with your Google account</p>
             <button className="google-login-button" onClick={handleGoogleLogin}>
             Login with Google
             </button>
         </div>
         </div>
     );
     };

     export default LoginPage;
     ```

     ```css login.css theme={null}
     .login-container {
         display: flex;
         justify-content: center;
         align-items: center;
         height: 100vh;
         background: #f7f8fa;
         font-family: 'Arial', sans-serif;
     }

     .login-box {
         background: white;
         padding: 40px;
         border-radius: 10px;
         box-shadow: 0 4px 8px rgba(0, 0, 0, 0.1);
         text-align: center;
     }

     .login-box h2 {
         margin-bottom: 20px;
         color: #333;
     }

     .login-box p {
         margin-bottom: 30px;
         color: #555;
     }

     .google-login-button {
         padding: 12px 20px;
         font-size: 16px;
         background-color: #4285f4;
         color: white;
         border: none;
         border-radius: 5px;
         cursor: pointer;
         transition: background-color 0.3s;
     }

     .google-login-button:hover {
         background-color: #357ae8;
     }
     ```
   </CodeGroup>

   Create `dashboard.js` and `dashboard.css` file for the Dashboard screen.

   <CodeGroup>
     ```jsx dashboard.js theme={null}
     import React from 'react';
     import { useLocation } from 'react-router-dom';
     import './dashboard.css'; 

     const DashboardPage = () => {
     const location = useLocation();
     const queryParams = new URLSearchParams(location.search);

     const user_id = queryParams.get('user_id');
     const access_token = queryParams.get('access_token');
     const token_type = queryParams.get('token_type');
     const expires_in = queryParams.get('expires_in');
     const email = queryParams.get('email');

     return (
         <div className="dashboard-container">
         <h1 className="dashboard-title">Welcome to Your Dashboard</h1>
         <div className="dashboard-content">
             <p><strong>User ID:</strong> {user_id}</p>
             <p><strong>Email:</strong> {email}</p>
             <p><strong>Access Token:</strong> {access_token}</p>
             <p><strong>Token Type:</strong> {token_type}</p>
             <p><strong>Expires In:</strong> {expires_in}</p>
         </div>
         </div>
     );
     };

     export default DashboardPage;
     ```

     ```css dashboard.css theme={null}
     .dashboard-container {
         padding: 40px;
         background-color: #f7f8fa;
         min-height: 100vh;
     }

     .dashboard-title {
         font-size: 28px;
         color: #333;
         margin-bottom: 20px;
         text-align: center;
     }

     .dashboard-content {
         background: white;
         padding: 30px;
         border-radius: 10px;
         box-shadow: 0 2px 20px rgba(0, 0, 0, 0.1);
     }

     .dashboard-content p {
         font-size: 18px;
         color: #555;
         margin-bottom: 15px;
     }

     .dashboard-content p strong {
         color: #333;
     }
     ```
   </CodeGroup>

## Step-4 : Make the API Request

1. Replace the `{auth_base_url}/oauth` in the `login.js` file with the copied URL from the environment details and with the path to the social google login endpoint.
   Here the `{auth_base_url}` is `http://authn.zeromagic.cloud/auth/86165f63f34e4be89809c2948c424a99/development/`

   > Note: Replace the `auth_base_url` ith your actual URL. The URL is followed by `/oauth` which is the path to the social google login endpoint.

2. Replace the `{your_app_key}` with your actual `APP-KEY` in the headers of `login.js` file. You can find the `APP-KEY` in the `Manage -> Settings` section of your console. Make sure to add `connection_name` as `google` in the body of the API request.

   ```jsx login.js theme={null}
       const handleGoogleLogin = async () => {
           try {
           // REPLACE_HERE : Replace the {auth_base_url}/oauth with the copied URL from the environment details and with the path to the social google login endpoint
           const response = await fetch('http://authn.zeromagic.cloud/auth/86165f63f34e4be89809c2948c424a99/development/oauth', {
               method: 'POST',
               headers: {
               'Content-Type': 'application/json',
               'APP-KEY' : 'lwc66BSZmPilT7UnNhlut2QFfRYr82ErXMqCYsKhtFM' // REPLACE_HERE : Replace the {your_app_key} with your actual APP-KEY
               },
               body: JSON.stringify({
               connection_name: 'google',
               }),
           });
       
           if (!response.ok) {
               alert('Failed to authenticate with Google');
               throw new Error('Failed to authenticate with Google');
           }
       
           const data = await response.json();
       
           // Check if the 'authorize_url' exists in the response
           const authorizeUrl = data['BODY']['authorize_url'];
           if (authorizeUrl) {
               // Open the URL in the browser
               window.location.href = authorizeUrl;
           } else {
               console.error('authorize_url not found in response');
           }
           } catch (error) {
           console.error('Error during Google login:', error);
           }
       };
   ```

## Step-5 : Run the ReactJS Application

1. Run the react application using the following command:

   ```bash theme={null}
   npm start
   ```

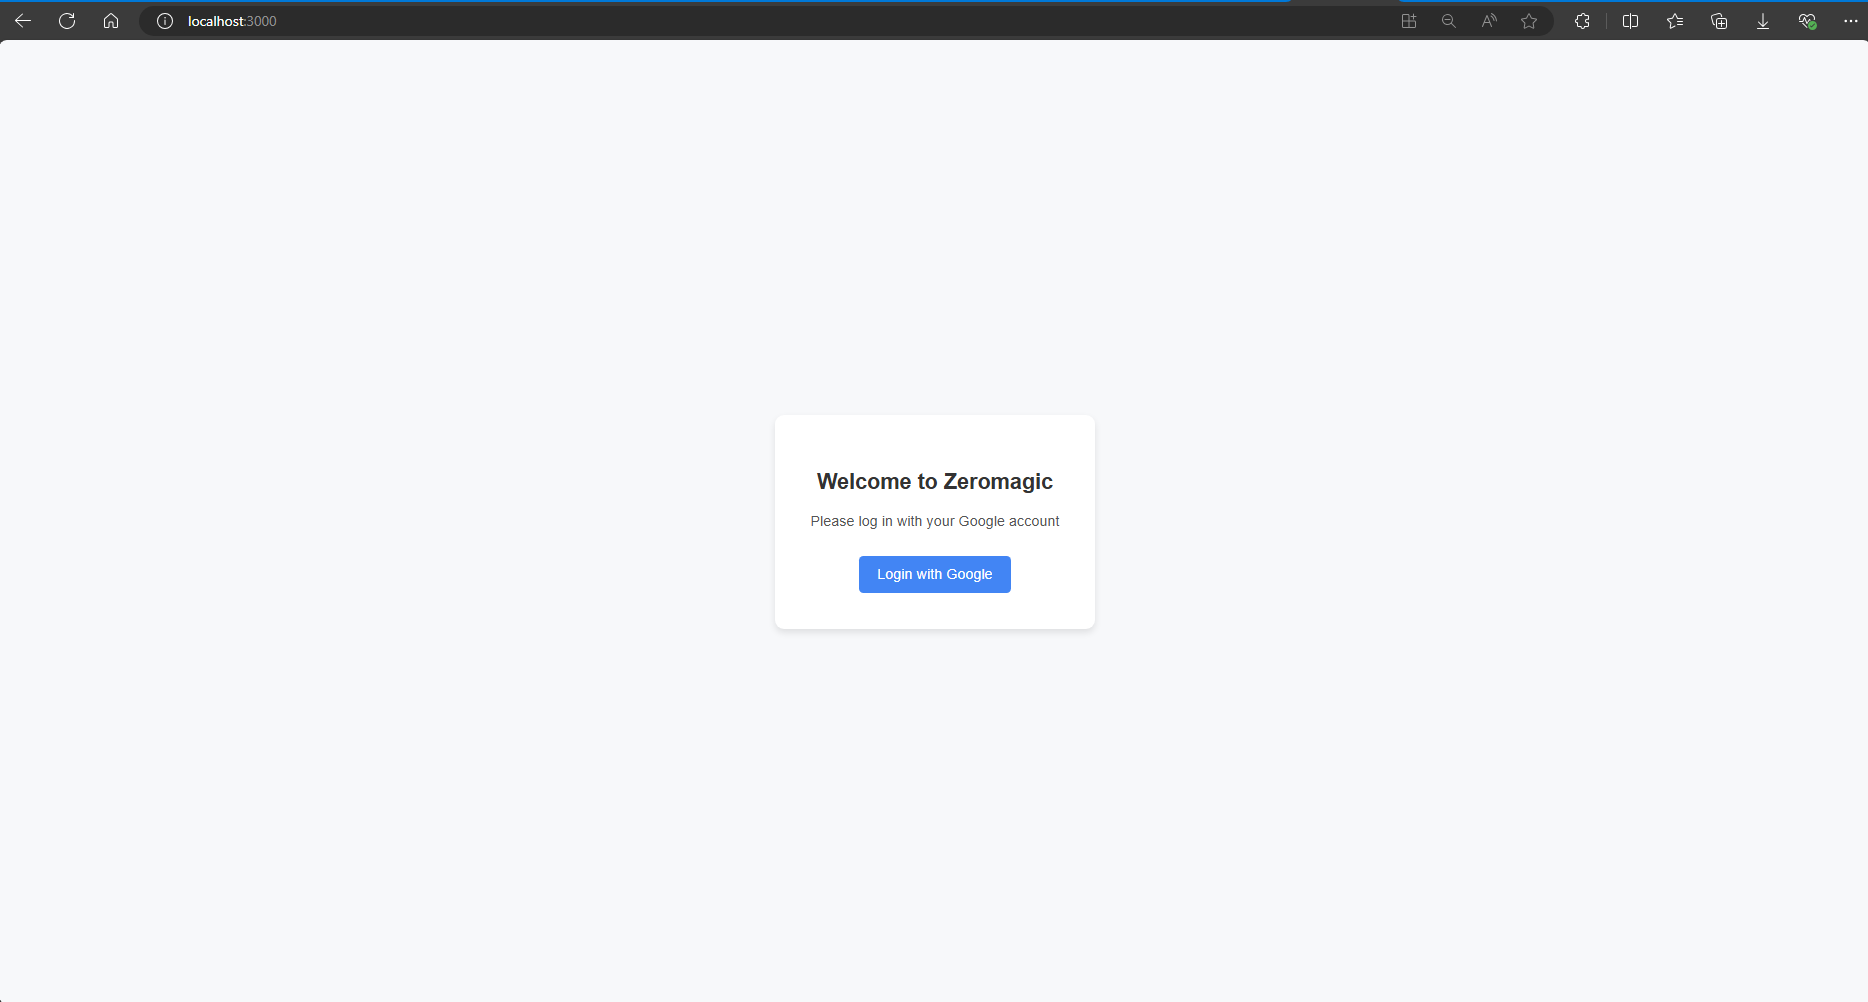
2. Open your browser and navigate to `http://localhost:3000`. You will see the login page with a Google sign-in button.

   <img src="https://mintcdn.com/zeromagiclabsprivatelimited/FNI2lo67ZZ_e31YS/assets/learn/authentication-oauth-output-1.png?fit=max&auto=format&n=FNI2lo67ZZ_e31YS&q=85&s=369c7b1b2f10de8d61ee8d5caf578d34" alt="Login Page" width="1868" height="1002" data-path="assets/learn/authentication-oauth-output-1.png" />

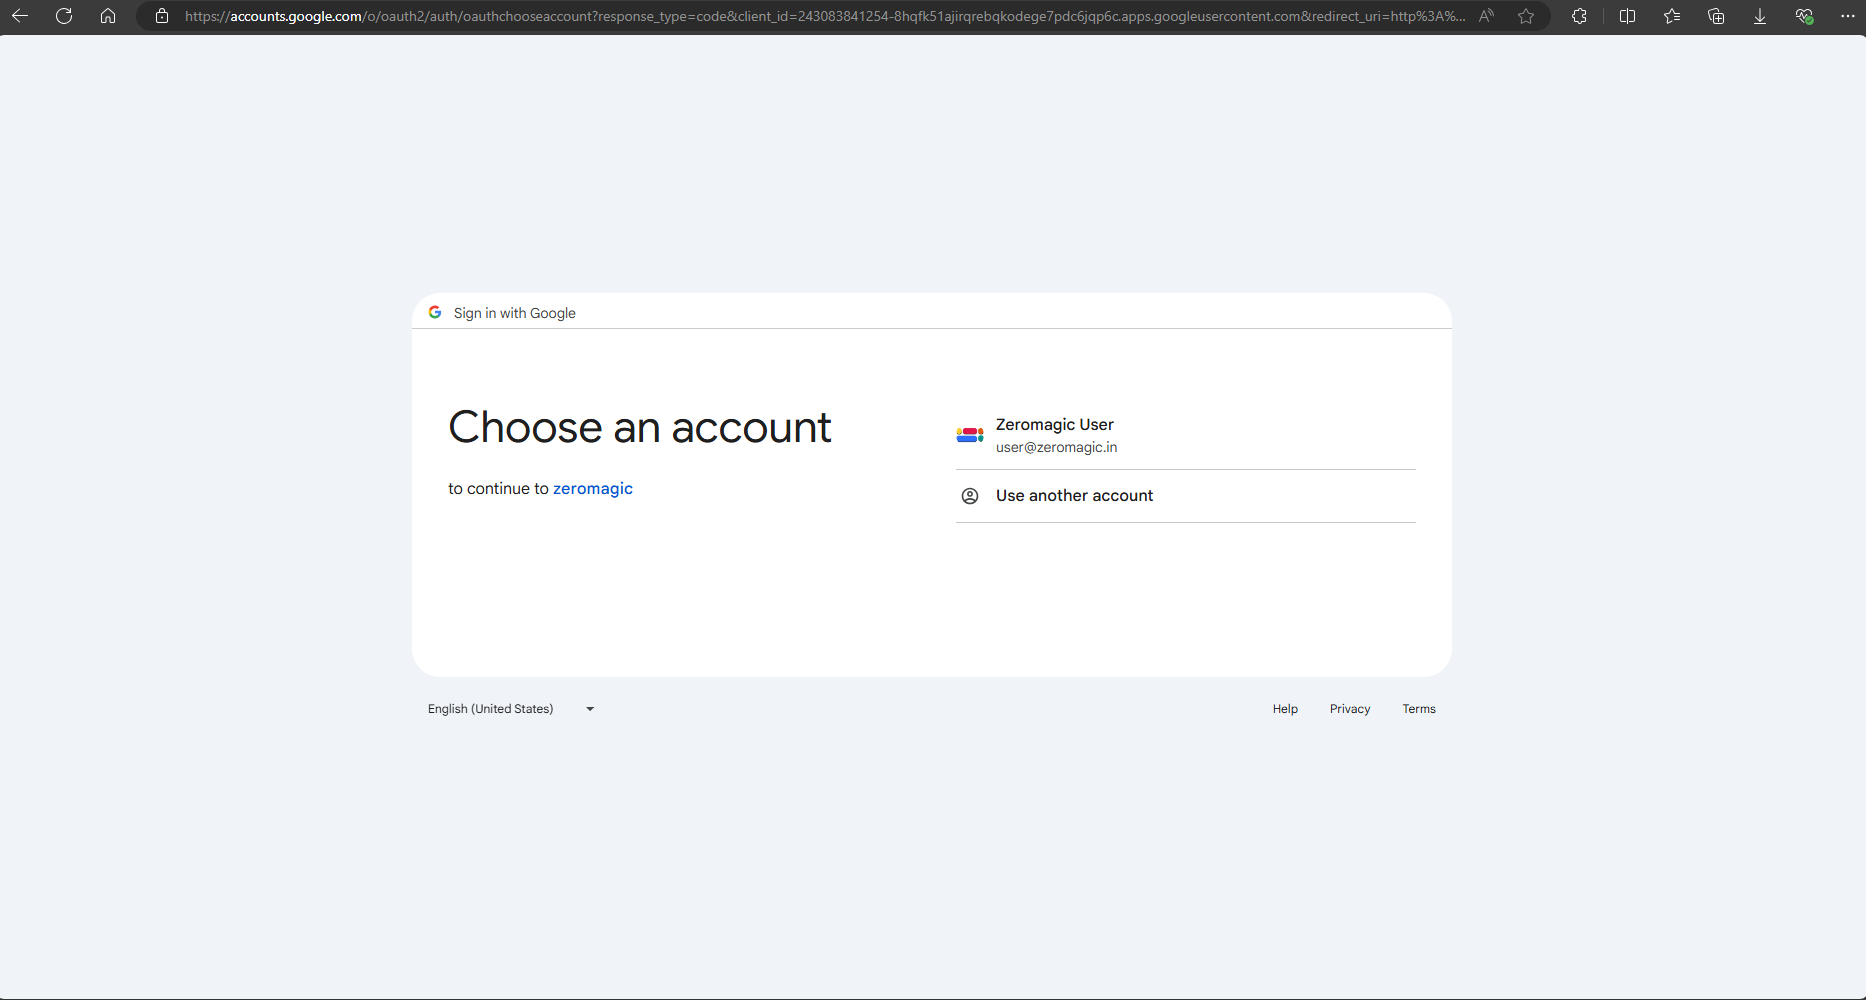
   Click on the `Login with Google` button. You will be redirected to the Google sign-in page. Sign in with your Google account.
   <img src="https://mintcdn.com/zeromagiclabsprivatelimited/FNI2lo67ZZ_e31YS/assets/learn/authentication-oauth-output-2.png?fit=max&auto=format&n=FNI2lo67ZZ_e31YS&q=85&s=86defc49420db6a177b4ab085233500e" alt="Google Sign-in" width="1866" height="1000" data-path="assets/learn/authentication-oauth-output-2.png" />

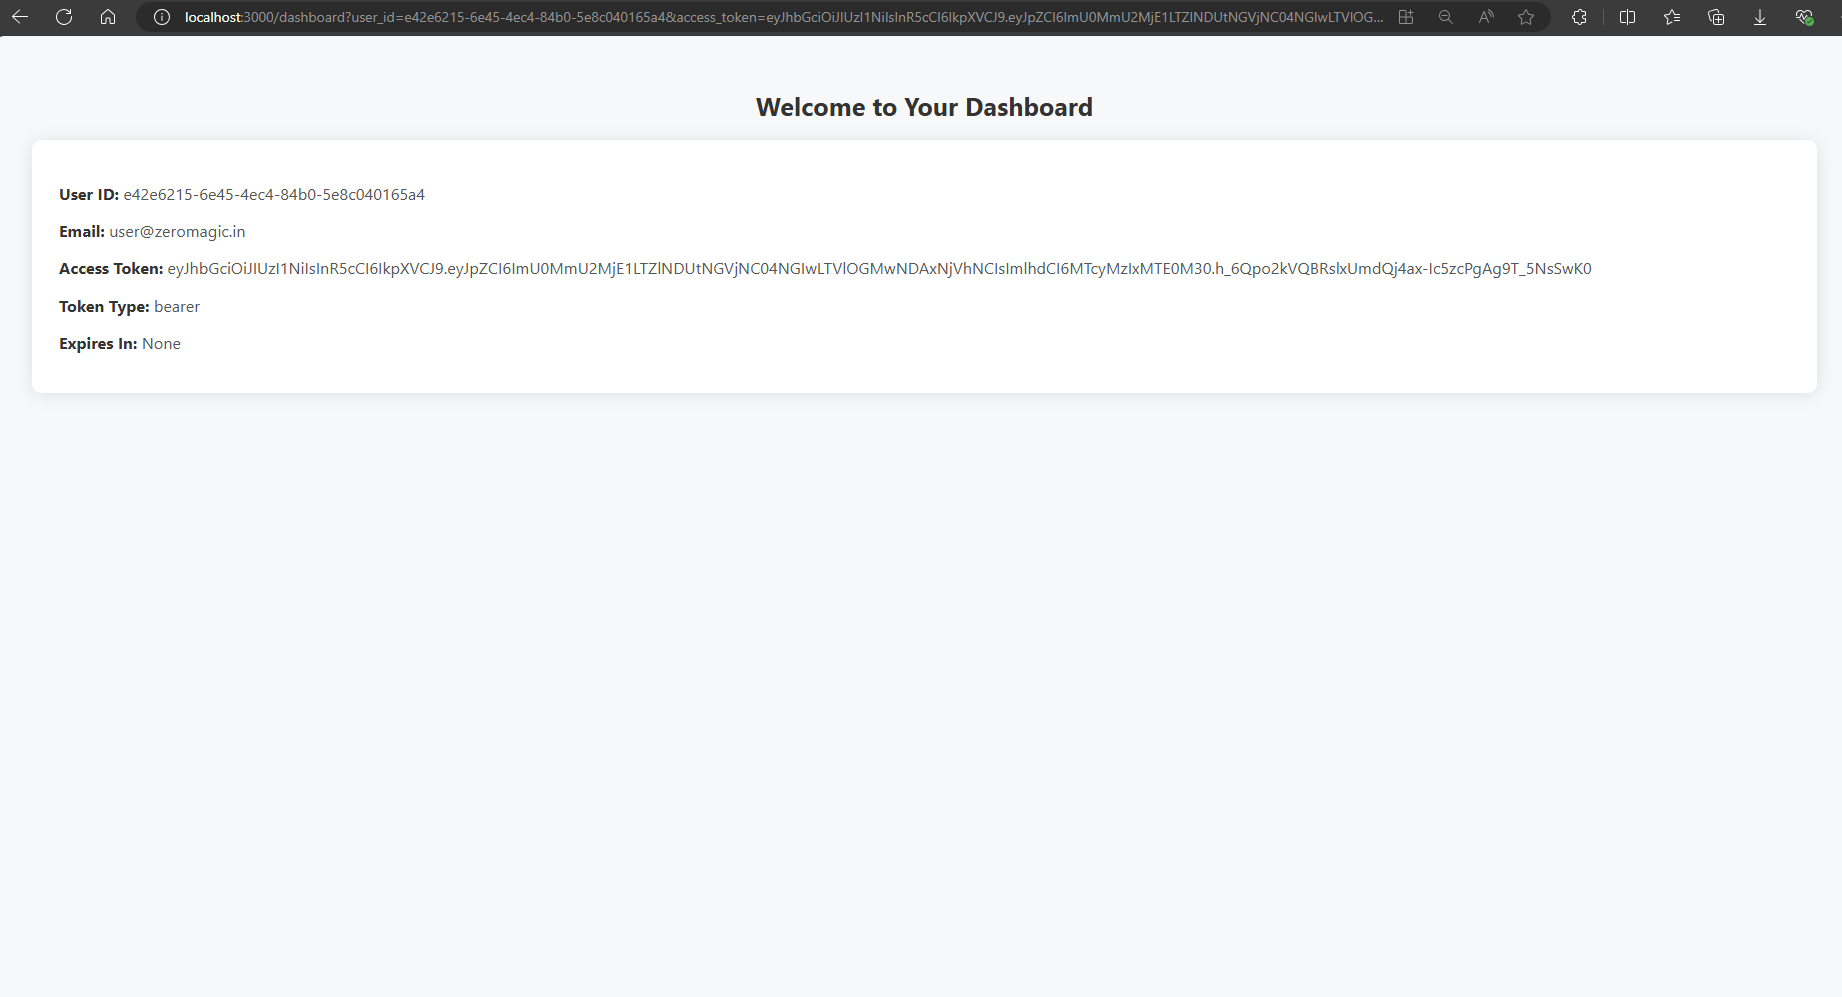
   On successful, you will be redirected to the dashboard page with the user details.
   <img src="https://mintcdn.com/zeromagiclabsprivatelimited/FNI2lo67ZZ_e31YS/assets/learn/authentication-oauth-output-3.png?fit=max&auto=format&n=FNI2lo67ZZ_e31YS&q=85&s=90f839260ab9d51f4387d935e2b128d6" alt="Dashboard Page" width="1842" height="997" data-path="assets/learn/authentication-oauth-output-3.png" />

## Summary

In this tutorial, you learned how to login application with Google OAuth using React JS and Zeromagic authentication API. This is a basic example to get you started with authentication in Zeromagic.

We provide more basic authentication methods and advanced method like social login. Feel free to explore the Authentication API Reference and reach out to us if you have any questions.

## Resource Links

* [Authentication API Reference](/authentication/api/generalinfo)