Login Successfull and user_id, access_token saved in the sessionStorage.
Click on the logout button to clear the sessionStorage and redirect to the login page.
Here is your dashboard content. You can customize it to display user-specific information and actions.
```
## Step 2 : Setup Authentication in Zeromagic
1. Create and open a new `Project` in the console. Add a `Database` to the project. You can use the database spinned up by Zeromagic or connect your own database. Here we are using the cosmosdb database provided by Zeromagic. To add a database, click on the `Create Database` on the `Database` section button and add your database.
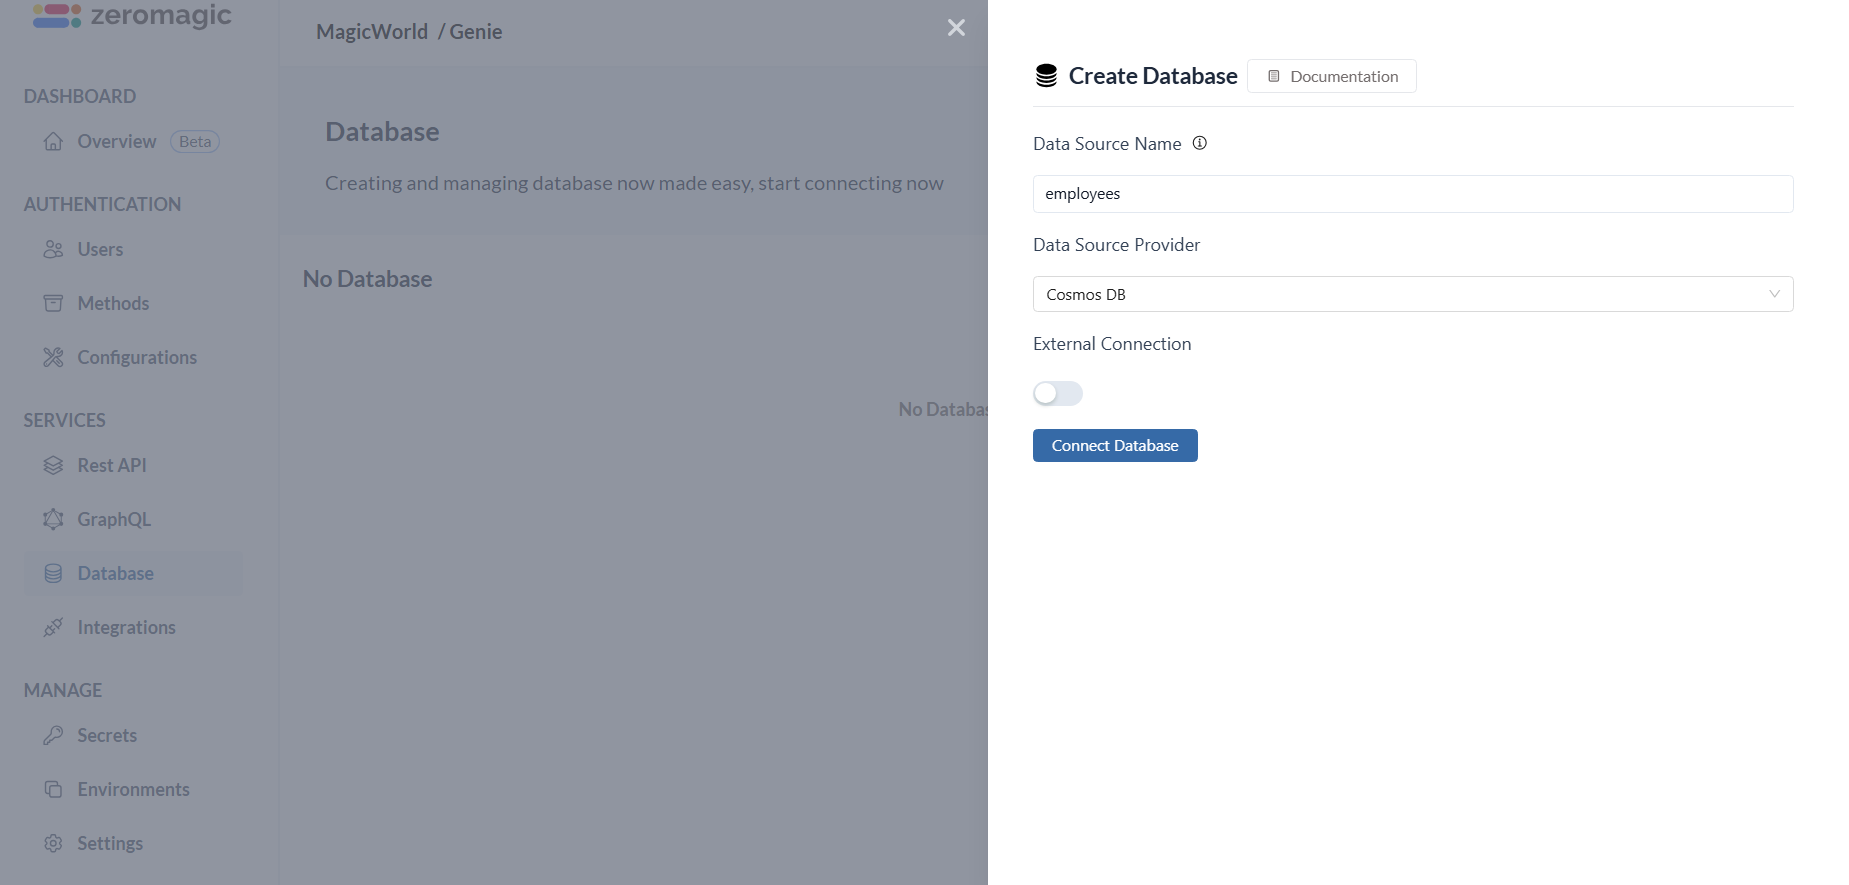 > Refer here to know more about: [Creating Database on the platform](/datasources/quickstart)
2. Create a new environment and map the added database to the environment. Here we are using the `development` environment and `employees` database
> Refer here to know more about: [Creating Database on the platform](/datasources/quickstart)
2. Create a new environment and map the added database to the environment. Here we are using the `development` environment and `employees` database
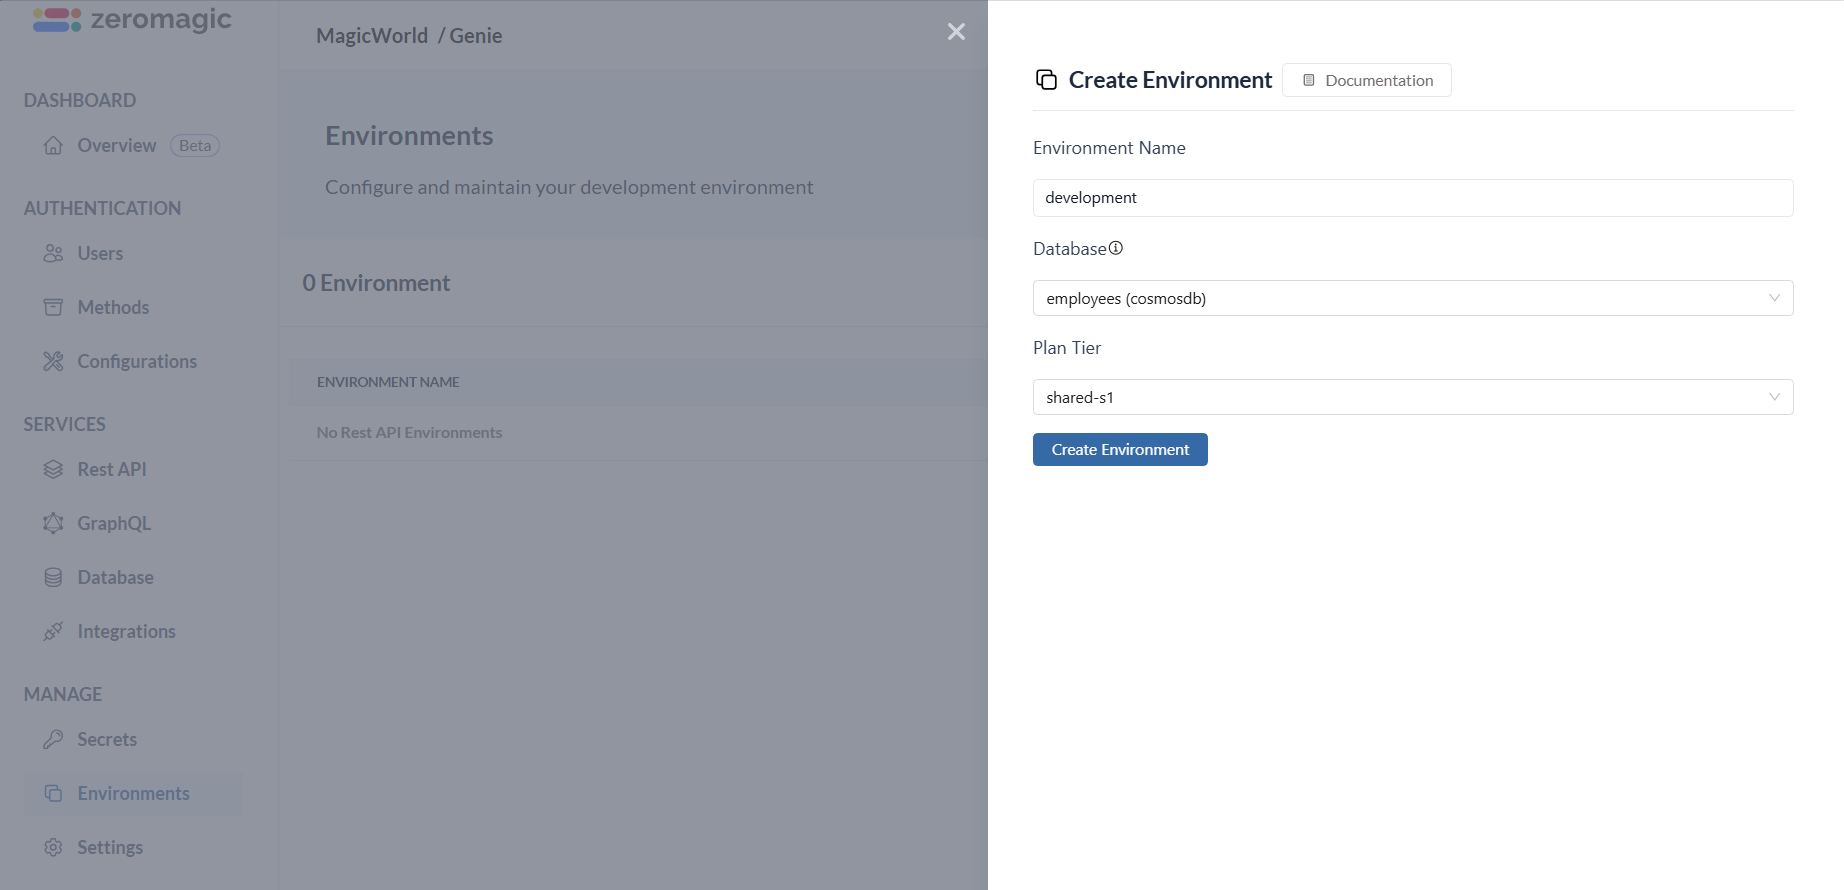 > Refer here to know more about: [Creating Environments on the platform](/basics/environment)
3. Add the `Email & Password` authentication connection under Methods. Click `Add Connection` to create a new connection.
> Refer here to know more about: [Creating Environments on the platform](/basics/environment)
3. Add the `Email & Password` authentication connection under Methods. Click `Add Connection` to create a new connection.
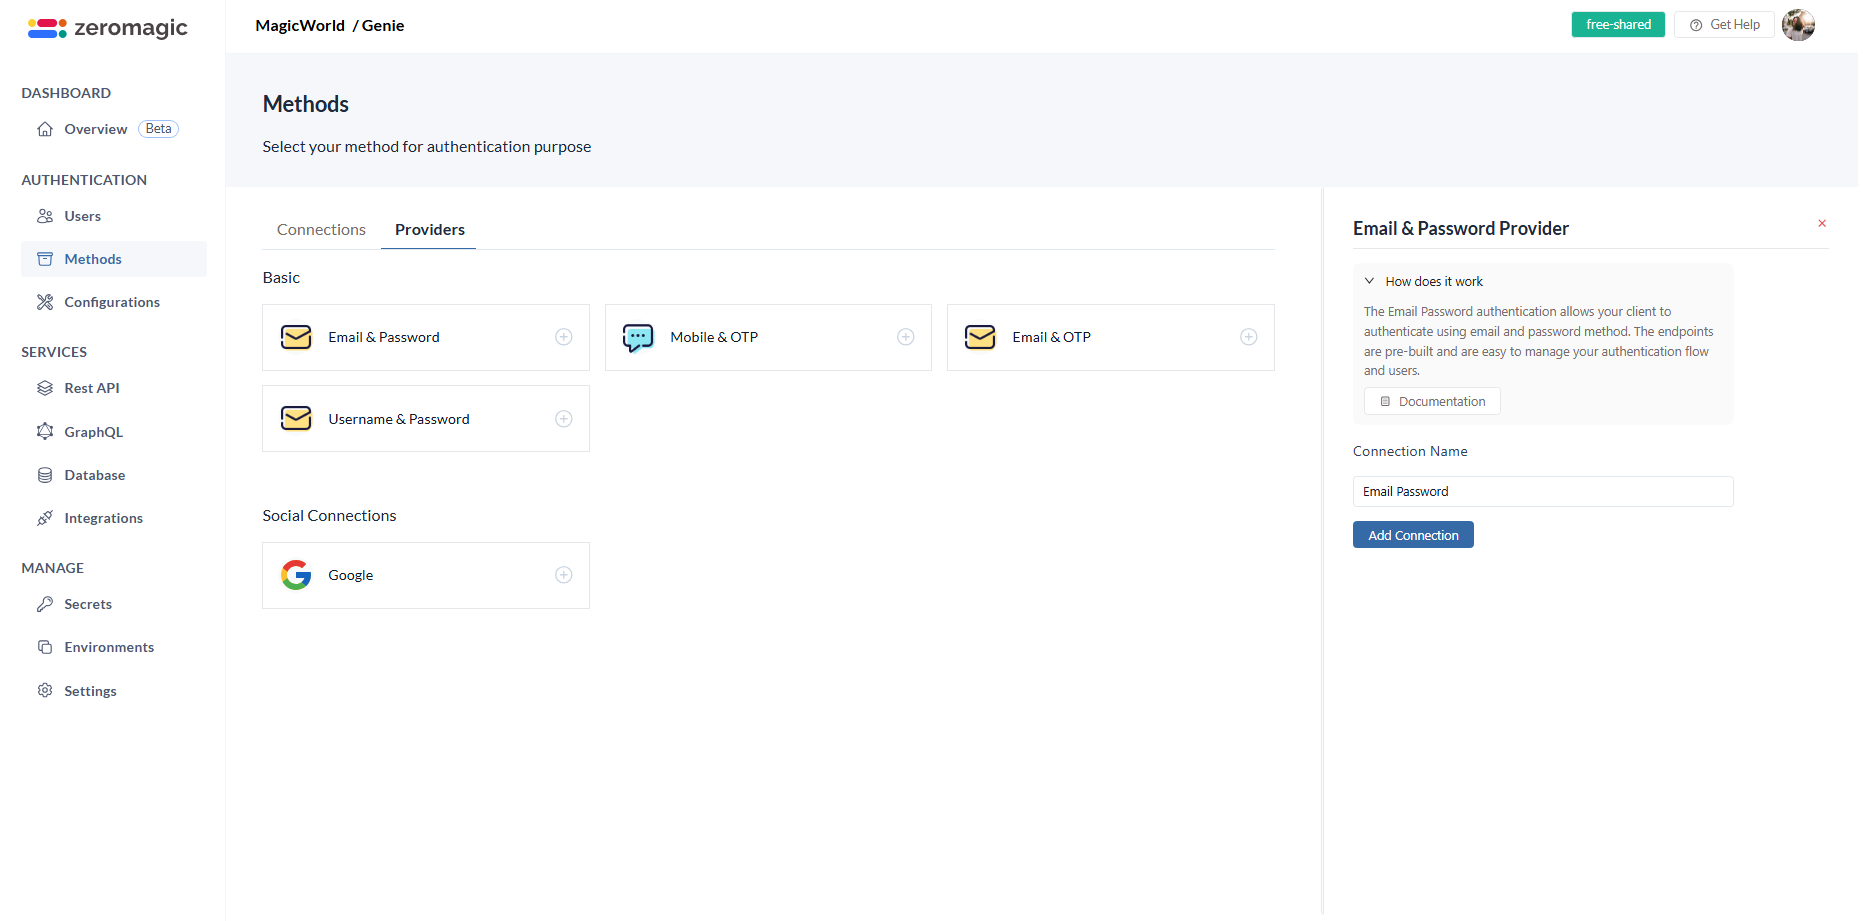 > Refer here to know more about: [Adding Authentication on the platform](/authentication/quickstart)
4. Now, go to `Environments` sections and select the environment you created. Copy the `Auth Endpoint URL` from the environment details. This is your authentication endpoint URL where you will be sending the APi requests. Your Auth endpoint URL looks similar to this:
```curl Auth Endpoint theme={null}
http://authn.zeromagic.cloud/auth/86165f63f34e4be89809c2948c424a99/development/
```
5. Before making the APi request, let's **create a new user credentials** in the database for this example. You can **skip this step if your preferring to go with registering the user** and login with that user credentials. We do provide endpoints to create a new user also.
> Refer here to know more about: [Adding Authentication on the platform](/authentication/quickstart)
4. Now, go to `Environments` sections and select the environment you created. Copy the `Auth Endpoint URL` from the environment details. This is your authentication endpoint URL where you will be sending the APi requests. Your Auth endpoint URL looks similar to this:
```curl Auth Endpoint theme={null}
http://authn.zeromagic.cloud/auth/86165f63f34e4be89809c2948c424a99/development/
```
5. Before making the APi request, let's **create a new user credentials** in the database for this example. You can **skip this step if your preferring to go with registering the user** and login with that user credentials. We do provide endpoints to create a new user also.
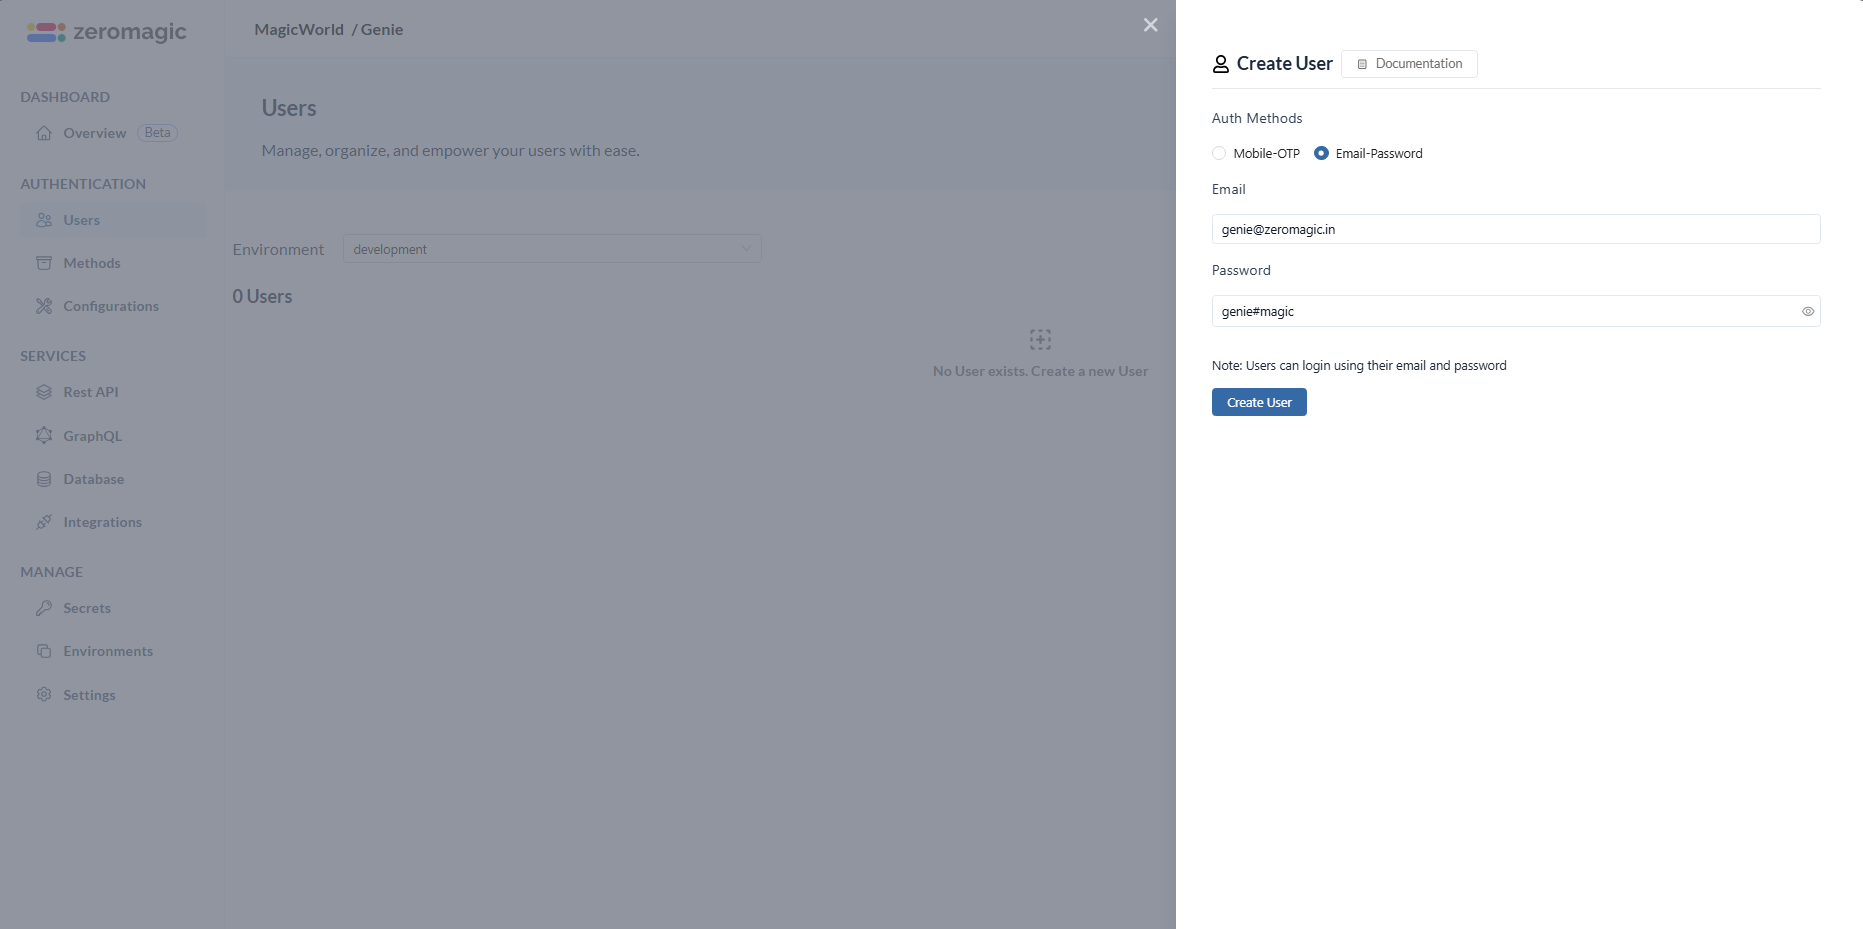 > Refer here to know more about: [Creating User on the platform](/authentication/users)
## Step 3 : Making the API Request
1. Replace the `{auth_base_url}/{auth_endpoint_path}` in the `login.html` file with the copied URL from the environment details and with the path to the email password login endpoint.
Here the `{auth_base_url}` is `http://authn.zeromagic.cloud/auth/86165f63f34e4be89809c2948c424a99/development/` and `{auth_endpoint_path}` is `/email-password-login`.
> Note: Replace the `auth_base_url` ith your actual URL. Refer to the [Authentication API Reference](/authentication/api/generalinfo) for more details on the API endpoints.
2. Replace the `{your_app_key}` with your actual `APP-KEY` in the headers of `login.html` file. You can find the `APP-ID` and `APP-KEY` in the `Manage -> Settings` section of your console.
```javascript login.html theme={null}
async function login(event) {
event.preventDefault();
document.getElementById('error-message').textContent = '';
const email = document.getElementById('email').value;
const password = document.getElementById('password').value;
try {
//REPLACE HERE : `{auth_base_url}/{auth_endpoint_path}` with your auth base URL and api endpoint
const response = await fetch('http://authn.zeromagic.cloud/auth/86165f63f34e4be89809c2948c424a99/development/email-password-login', {
method: 'POST',
headers: {
'Content-Type': 'application/json',
//REPLACE HERE : `{your_app_key}` with your APP-KEY
'APP-KEY': 'lwc66BSZmPilT7UnNhlut2QFfRYr82ErXMqCYsKhtFM'
},
body: JSON.stringify({ email, password })
});
if (response.ok) {
const data = await response.json();
sessionStorage.setItem('user_id', data.BODY.user_id);
sessionStorage.setItem('token', data.BODY.access_token);
window.location.href = 'dashboard.html';
} else {
console.error('Error:', response);
document.getElementById('error-message').textContent = 'Login failed. Please check your credentials.';
}
} catch (error) {
console.error('Error:', error);
document.getElementById('error-message').textContent = 'An error occurred. Please try again later.';
}
}
```
## Step 4 : Run the Application and Login
1. Open the `login.html` file in your browser or with your preferred webserver. Enter the email and password of the user you created in the database and click on the `Login` button. Here login credentials users are
```curl Sample Credentails theme={null}
email=genie@zeromagic.cloud
password=genie#magic
```
2. If the login is successful, you will be redirected to the `dashboard.html` page. If the login fails, you will see an alert message.
## Summary
In this tutorial, you learned how to create a simple login form using HTML and JavaScript and authenticate users using the Zeromagic authentication API. This is a basic example to get you started with authentication in Zeromagic.
We provide more basic authentication methods and advanced method like social login. Feel free to explore the Authentication API Reference and reach out to us if you have any questions.
## Resource Links
* [Authentication API Reference](/authentication/api/generalinfo)
> Refer here to know more about: [Creating User on the platform](/authentication/users)
## Step 3 : Making the API Request
1. Replace the `{auth_base_url}/{auth_endpoint_path}` in the `login.html` file with the copied URL from the environment details and with the path to the email password login endpoint.
Here the `{auth_base_url}` is `http://authn.zeromagic.cloud/auth/86165f63f34e4be89809c2948c424a99/development/` and `{auth_endpoint_path}` is `/email-password-login`.
> Note: Replace the `auth_base_url` ith your actual URL. Refer to the [Authentication API Reference](/authentication/api/generalinfo) for more details on the API endpoints.
2. Replace the `{your_app_key}` with your actual `APP-KEY` in the headers of `login.html` file. You can find the `APP-ID` and `APP-KEY` in the `Manage -> Settings` section of your console.
```javascript login.html theme={null}
async function login(event) {
event.preventDefault();
document.getElementById('error-message').textContent = '';
const email = document.getElementById('email').value;
const password = document.getElementById('password').value;
try {
//REPLACE HERE : `{auth_base_url}/{auth_endpoint_path}` with your auth base URL and api endpoint
const response = await fetch('http://authn.zeromagic.cloud/auth/86165f63f34e4be89809c2948c424a99/development/email-password-login', {
method: 'POST',
headers: {
'Content-Type': 'application/json',
//REPLACE HERE : `{your_app_key}` with your APP-KEY
'APP-KEY': 'lwc66BSZmPilT7UnNhlut2QFfRYr82ErXMqCYsKhtFM'
},
body: JSON.stringify({ email, password })
});
if (response.ok) {
const data = await response.json();
sessionStorage.setItem('user_id', data.BODY.user_id);
sessionStorage.setItem('token', data.BODY.access_token);
window.location.href = 'dashboard.html';
} else {
console.error('Error:', response);
document.getElementById('error-message').textContent = 'Login failed. Please check your credentials.';
}
} catch (error) {
console.error('Error:', error);
document.getElementById('error-message').textContent = 'An error occurred. Please try again later.';
}
}
```
## Step 4 : Run the Application and Login
1. Open the `login.html` file in your browser or with your preferred webserver. Enter the email and password of the user you created in the database and click on the `Login` button. Here login credentials users are
```curl Sample Credentails theme={null}
email=genie@zeromagic.cloud
password=genie#magic
```
2. If the login is successful, you will be redirected to the `dashboard.html` page. If the login fails, you will see an alert message.
## Summary
In this tutorial, you learned how to create a simple login form using HTML and JavaScript and authenticate users using the Zeromagic authentication API. This is a basic example to get you started with authentication in Zeromagic.
We provide more basic authentication methods and advanced method like social login. Feel free to explore the Authentication API Reference and reach out to us if you have any questions.
## Resource Links
* [Authentication API Reference](/authentication/api/generalinfo)