> ## Documentation Index
> Fetch the complete documentation index at: https://nocode-docs.zeroagent.io/llms.txt
> Use this file to discover all available pages before exploring further.
# Build your first rest api in minutes using zeromagic flow builder
 In this blog post, we'll explore how to create your first REST API on the Zeromagic Platform. Whether you're a beginner or an experienced developer, our intuitive Workflow Builder will guide you through setting up endpoints, defining data models, and handling HTTP requests. Let's dive in and see how you can quickly build and deploy a functional REST API with GET and POST methods, empowering your applications with seamless data interactions.
### Step 1: Login to Project Console
Login to [Zeromagic Platform](https://console.zeromagic.cloud/) and go to you `Project Console`. Now navigate to `Rest API` in the sidebar of the console.
In this blog post, we'll explore how to create your first REST API on the Zeromagic Platform. Whether you're a beginner or an experienced developer, our intuitive Workflow Builder will guide you through setting up endpoints, defining data models, and handling HTTP requests. Let's dive in and see how you can quickly build and deploy a functional REST API with GET and POST methods, empowering your applications with seamless data interactions.
### Step 1: Login to Project Console
Login to [Zeromagic Platform](https://console.zeromagic.cloud/) and go to you `Project Console`. Now navigate to `Rest API` in the sidebar of the console.
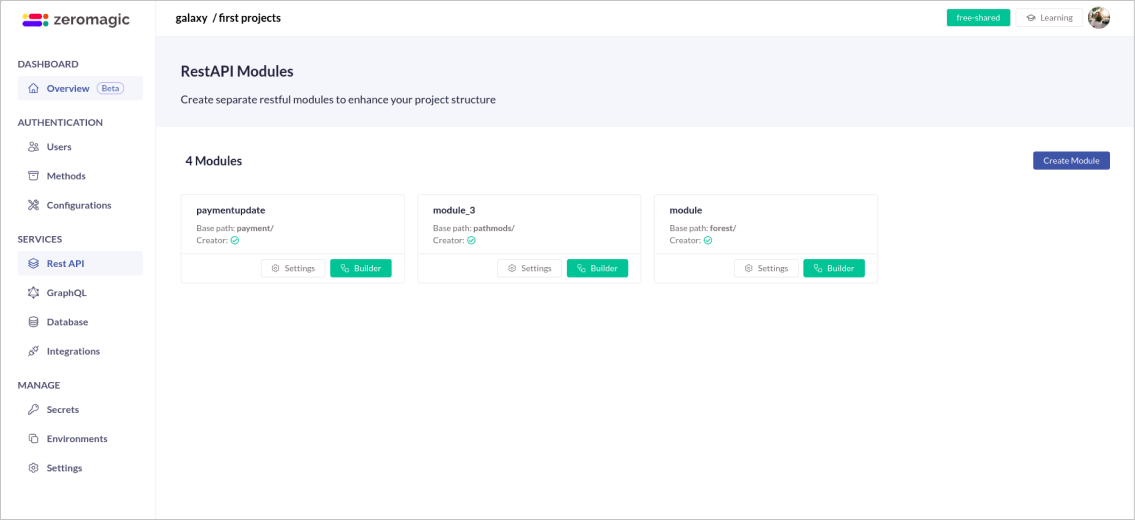 Modules are often used to structure and organize API endpoints when building RESTful APIs. Each module can represent a specific domain or resource within your application.
### Step 2: Create a new Module
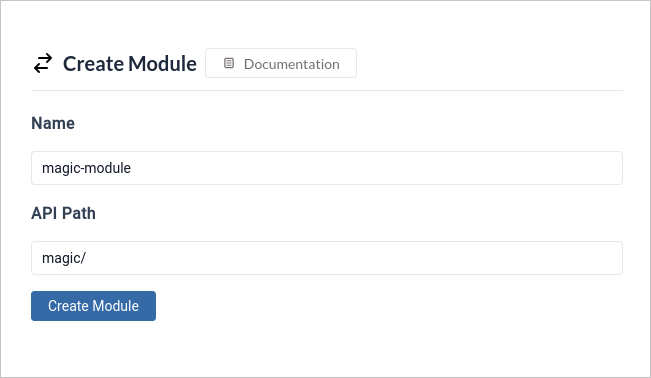
Now click on `Create Module` button to create a new module. This open a form to create a new module. Enter the `Name` and `API path` of the module.
> Note : API Path only follows the trailing slash.
Modules are often used to structure and organize API endpoints when building RESTful APIs. Each module can represent a specific domain or resource within your application.
### Step 2: Create a new Module
Now click on `Create Module` button to create a new module. This open a form to create a new module. Enter the `Name` and `API path` of the module.
> Note : API Path only follows the trailing slash.
 Once module is created, click on the module and you will be directed to the Flow Builder Page where you can create your `Rest API`.
### Step 3: Create a new Rest API
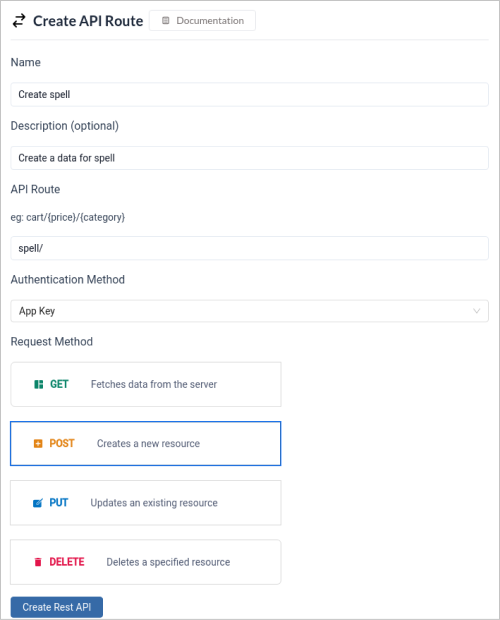
Look for a button labeled `Create Rest API` or `+` in the API List space within the interface. This button will initiate the process of creating a new REST API definition.
* `Name` : Name of the API
* `Description`:Short description of the API
* `API Route`: Define the base URL path that will be used to access the API endpoints. This path can include path parameters (indicated by `{}`) to capture dynamic values in the URL.\
**Example**: `/users/{userId}` (where `{userId}` would be a variable placeholder captured from the request URL).
* `Authentication Method`: If your API requires authentication to access certain or all resources, select the appropriate authentication method. Check on the [Debug section](/restapi/debuglogs) to know more about authentication.
* `Request Method`: Specify the HTTP method that clients should use to interact with your API.
Once module is created, click on the module and you will be directed to the Flow Builder Page where you can create your `Rest API`.
### Step 3: Create a new Rest API
Look for a button labeled `Create Rest API` or `+` in the API List space within the interface. This button will initiate the process of creating a new REST API definition.
* `Name` : Name of the API
* `Description`:Short description of the API
* `API Route`: Define the base URL path that will be used to access the API endpoints. This path can include path parameters (indicated by `{}`) to capture dynamic values in the URL.\
**Example**: `/users/{userId}` (where `{userId}` would be a variable placeholder captured from the request URL).
* `Authentication Method`: If your API requires authentication to access certain or all resources, select the appropriate authentication method. Check on the [Debug section](/restapi/debuglogs) to know more about authentication.
* `Request Method`: Specify the HTTP method that clients should use to interact with your API.
 ### Step 4: Update Workflow to create Spell data in Database
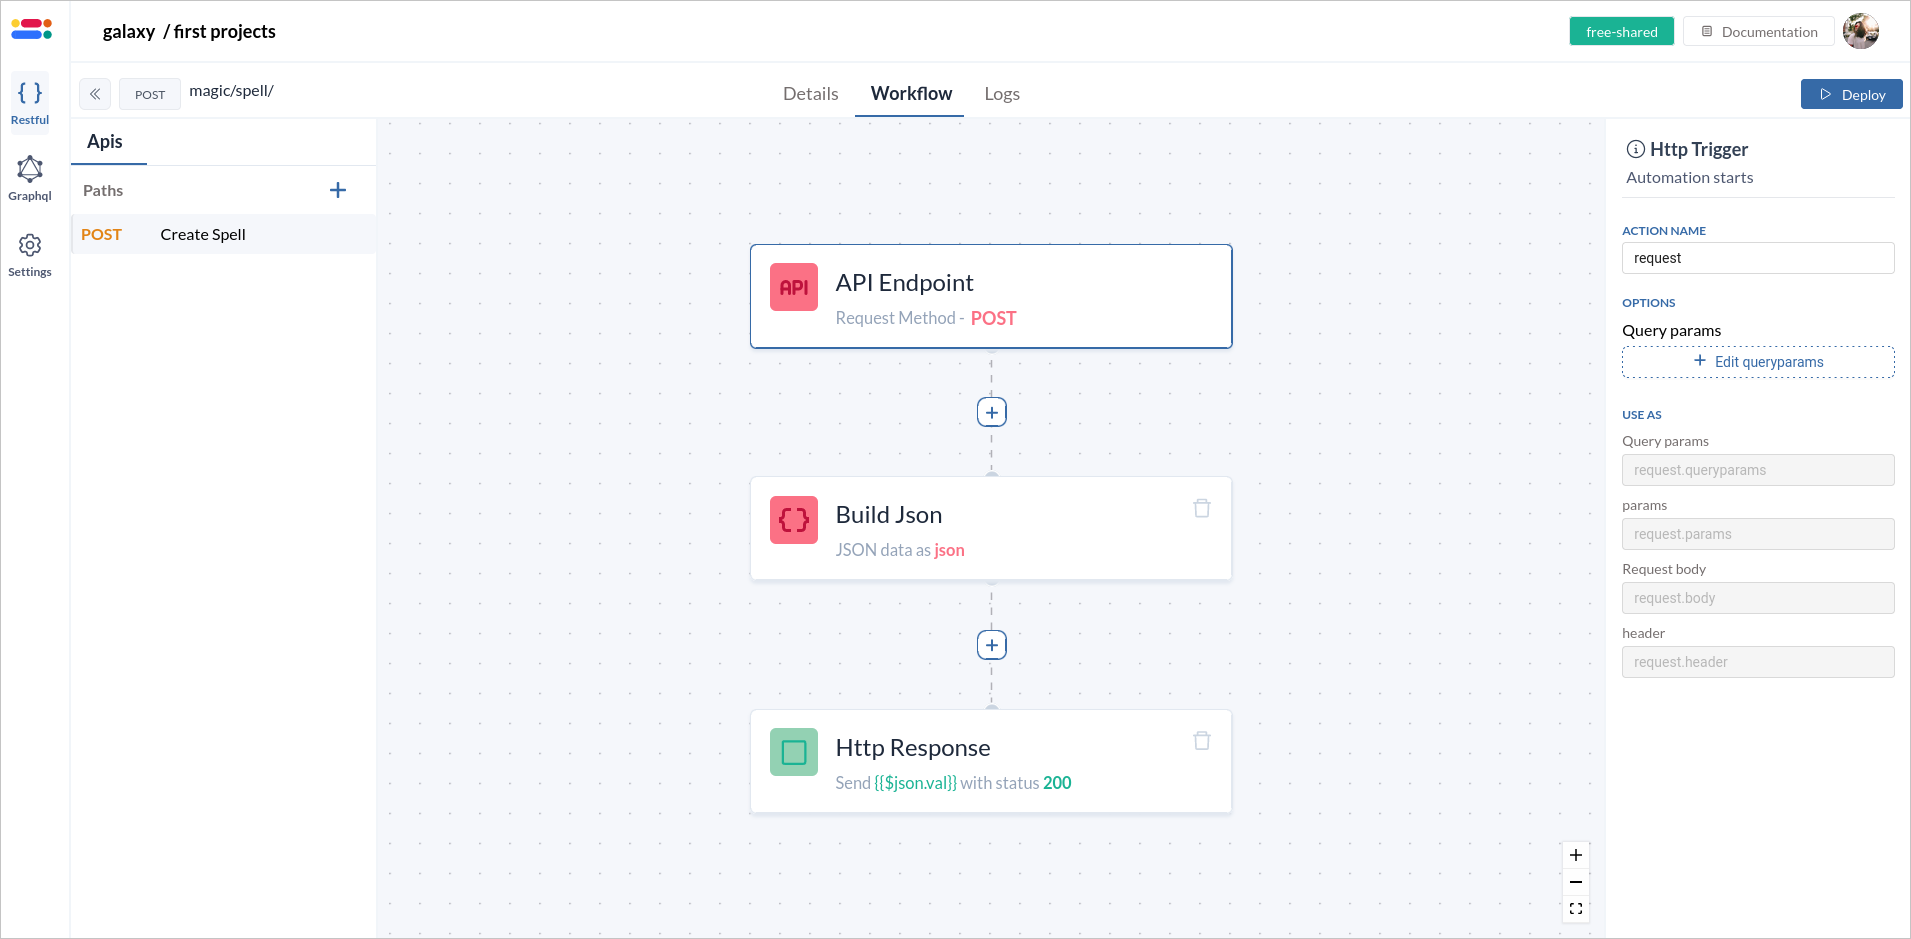
The Worflow builder has 3 basic Blocks such `API Endpoint`, `Build JSON` and `HTTP Response` in the workflow canvas.
### Step 4: Update Workflow to create Spell data in Database
The Worflow builder has 3 basic Blocks such `API Endpoint`, `Build JSON` and `HTTP Response` in the workflow canvas.
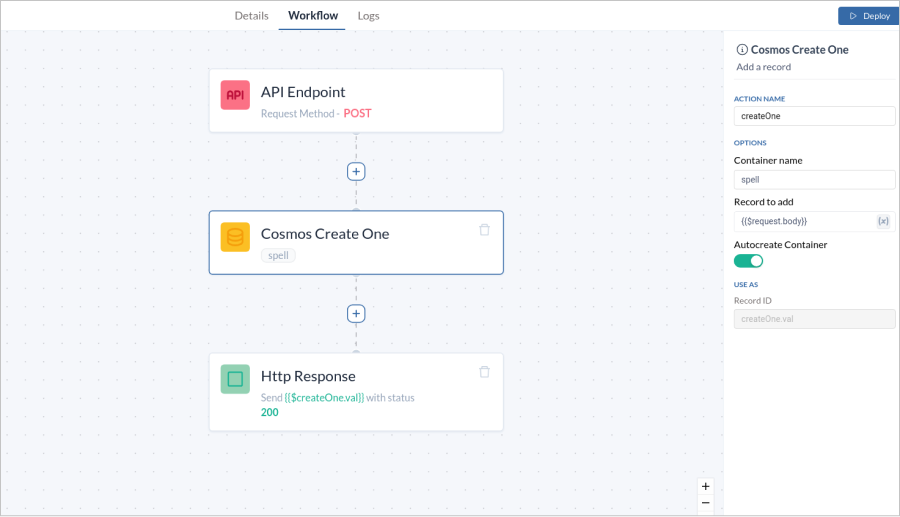
 Now let's add `Cosmos Create One` block in the workflow to create `Spell` data in the database.
> Assuming that the database is configured in the Database section of the Project Console.
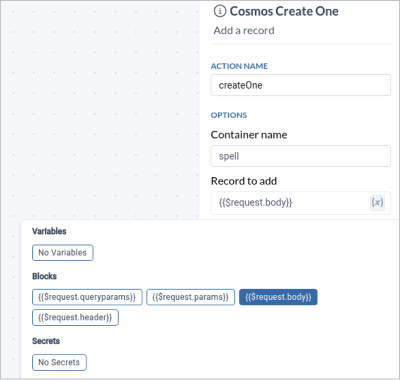
In the "Cosmos Create One" options panel, locate the "container name" field (also referred to as "alias tables"). Enter "spell" as the container name (table name). Then, in the "Record to add" field, input the body data of your request
The **container name** field specifies the preferred name for your table (e.g., "spell"). This name will be used as an alias when accessing the table.
Now let's add `Cosmos Create One` block in the workflow to create `Spell` data in the database.
> Assuming that the database is configured in the Database section of the Project Console.
In the "Cosmos Create One" options panel, locate the "container name" field (also referred to as "alias tables"). Enter "spell" as the container name (table name). Then, in the "Record to add" field, input the body data of your request
The **container name** field specifies the preferred name for your table (e.g., "spell"). This name will be used as an alias when accessing the table.
 Toggle on `Auto create` to automatically create a new instance of the schema with the specified container if it is not already created.
Now in the `HTTP Response` update the **Response Variable** to `{{$createOne.val}}` which is output of the Cosmos Create One.
Toggle on `Auto create` to automatically create a new instance of the schema with the specified container if it is not already created.
Now in the `HTTP Response` update the **Response Variable** to `{{$createOne.val}}` which is output of the Cosmos Create One.
 HTTP Response blocks accepts only **JSON** as response. Make sure your value in response is a JSON.
Now click on the `Deploy` button such that the API is automatically deployed and can be accessed in the specific environment.
### Step 5: Test the POST method
#### 1. Test using Platform
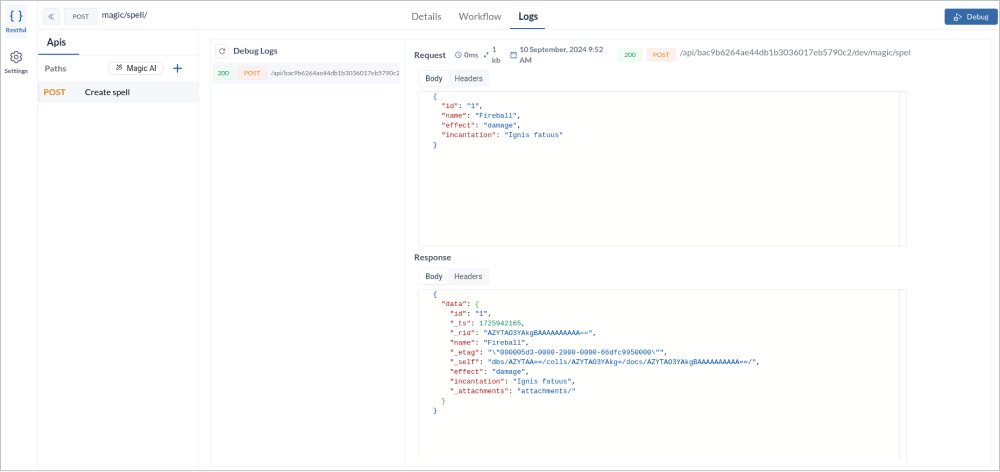
You can test your API by navigating to `Logs` section. Click on `Debug` button to provide your test data. Select the `environment` and provide the necessary body data.
> Pass you `APP-KEY` in the headers (since your authentication is selected as **APP-KEY**) which can be found in your project settings.
Make sure to pass `id` key in the body data while using `POST` method.
HTTP Response blocks accepts only **JSON** as response. Make sure your value in response is a JSON.
Now click on the `Deploy` button such that the API is automatically deployed and can be accessed in the specific environment.
### Step 5: Test the POST method
#### 1. Test using Platform
You can test your API by navigating to `Logs` section. Click on `Debug` button to provide your test data. Select the `environment` and provide the necessary body data.
> Pass you `APP-KEY` in the headers (since your authentication is selected as **APP-KEY**) which can be found in your project settings.
Make sure to pass `id` key in the body data while using `POST` method.
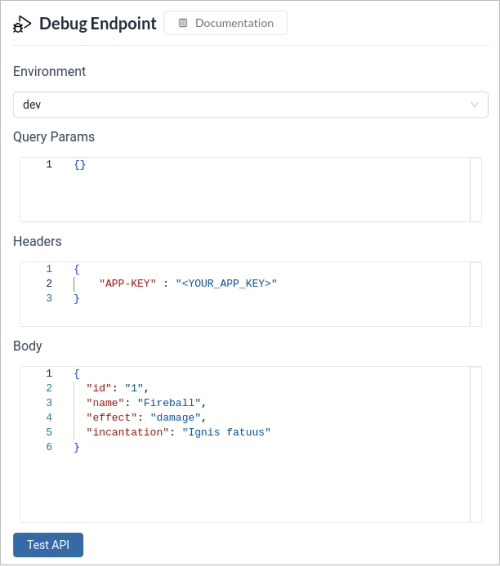 Click on `Test API` and you can see the API logs in the page once your API is executed.
 #### 2. Test using Postman
You can access the API by selecting the specific environment you need. You can find the **API Endpoint** in the `Details` tab.
Copy the API endpoint and paste in the URL section of the postman. Select method to `POST` and nagivate to `Headers` and `Body` section to pass the required data.
#### 2. Test using Postman
You can access the API by selecting the specific environment you need. You can find the **API Endpoint** in the `Details` tab.
Copy the API endpoint and paste in the URL section of the postman. Select method to `POST` and nagivate to `Headers` and `Body` section to pass the required data.

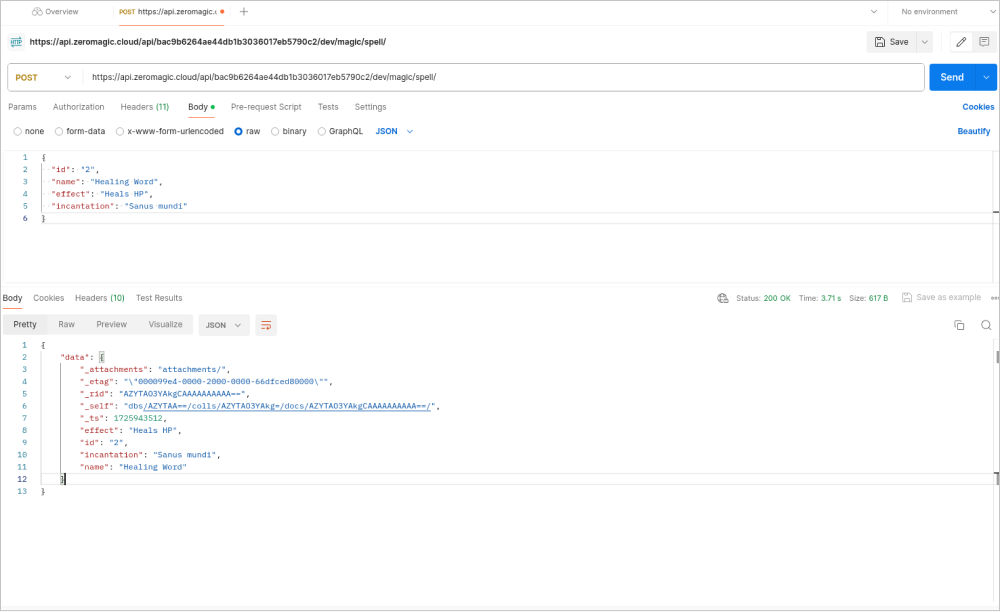 You can also check the log of this particular request in the `Logs` section of the API in the Zeromagic console.
### Step 6: Create new flow to GET Spell Data from DB
Now let's create a new **Rest API** to fetch Spell data. Click on the `+` icon on the RestAPI List section. Enter the details of the API required to fetch the Spell data.
Add the `Cosmos Read Many` block in the workflow to get all the information of the `Spells` from the database. Add the `Container name`, `Sort Key` and `Sort Order` in the Options panel.
Now in the `HTTP Response` update the **Response Variable** to `{{$readMany.val}}` which is output of the Cosmos Read Many.
You can also check the log of this particular request in the `Logs` section of the API in the Zeromagic console.
### Step 6: Create new flow to GET Spell Data from DB
Now let's create a new **Rest API** to fetch Spell data. Click on the `+` icon on the RestAPI List section. Enter the details of the API required to fetch the Spell data.
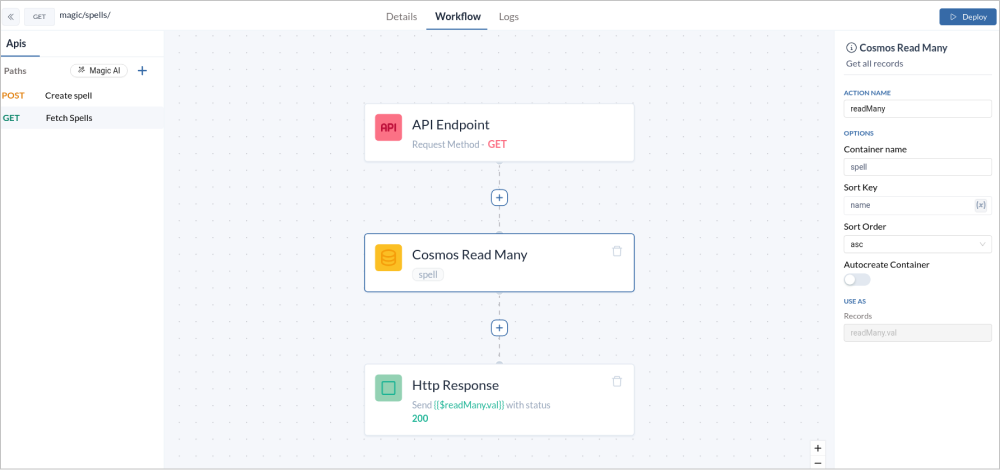
Add the `Cosmos Read Many` block in the workflow to get all the information of the `Spells` from the database. Add the `Container name`, `Sort Key` and `Sort Order` in the Options panel.
Now in the `HTTP Response` update the **Response Variable** to `{{$readMany.val}}` which is output of the Cosmos Read Many.
 Now click on the `Deploy` button such that the API is automatically deployed and can be accessed in the specific environment.
### Step 7: Test the GET method
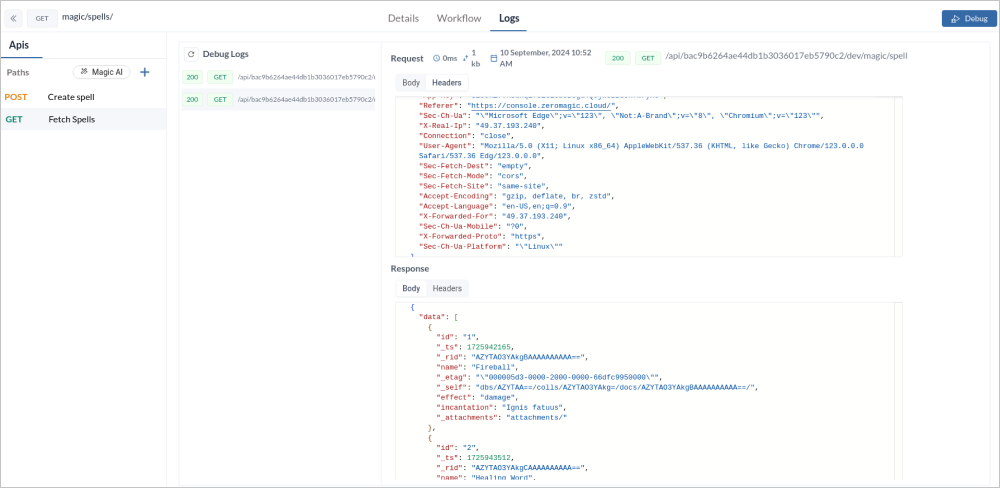
Navigate to the `Logs` section and click on the `Debug` button. Provide the necessary `Headers` according to the **authentication** settings.
Now click on the `Deploy` button such that the API is automatically deployed and can be accessed in the specific environment.
### Step 7: Test the GET method
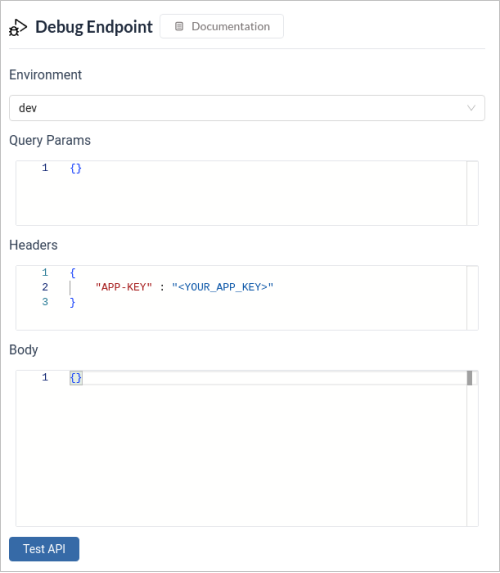
Navigate to the `Logs` section and click on the `Debug` button. Provide the necessary `Headers` according to the **authentication** settings.
 With Zeromagic, creating powerful REST APIs is easier than ever. Sign up for Zeromagic and start building your first REST API in minutes. The future of API development is here.